
5주차 이전 게시물에서는 BGP를 활용한 native 모드에 대한 라우팅 설정 방법을 알아보았다.
이번에는 cilium clusterMesh를 위한 방법에 대해서 알아보려고 한다. 실습 환경은 kind를 활용한다.
kind는 예전 게시물에서도 한번 다뤘었다.
팀원분이 Local PC에서 테스트하기 쉬운 방법으로 알려줬었는데, 아주아주 잘 사용하고 있다.
kube-proxy를 대체해서 설치할 수도 있고, kubeadm 만큼은 아니지만 테스트하기에는 이런 도구만한것도 없다고 생각한다.
[k8s] kind 활용, Local PC에서 Kubernetes 설치
기존의 회사에서는 AWS EKS 플랫폼을 이용해 회사 서비스를 올리고, 운영을 하고 있었다.그렇기 때문에 Control Plane 관리에 대해서는 AWS에 일임하였기 때문에 관심대상이 아니였으나최근에 IDC 환경
dobby-isfree.tistory.com
실습 환경 구성
환경은 cluster mesh를 테스트하기 위해서 west <-> east cluster를 구성하고 이에 대한 트래픽 흐름을 연구한다.
설치하는 방법은 간단하다. kind config를 만들고 kind 명령어를 통해서 배포하기만 하면 된다.
kind create cluster --name west --image kindest/node:v1.33.2 --config - <<EOF
kind: Cluster
apiVersion: kind.x-k8s.io/v1alpha4
nodes:
- role: control-plane
  extraPortMappings:
  - containerPort: 30000 # sample apps
    hostPort: 30000
  - containerPort: 30001 # hubble ui
    hostPort: 30001
- role: worker
  extraPortMappings:
  - containerPort: 30002 # sample apps
    hostPort: 30002
networking:
  podSubnet: "10.0.0.0/16"
  serviceSubnet: "10.2.0.0/16"
  disableDefaultCNI: true
  kubeProxyMode: none
EOF
---
docker exec -it west-control-plane sh -c 'apt update && apt install tree psmisc lsof wget net-tools dnsutils tcpdump ngrep iputils-ping git -y'
docker exec -it west-worker sh -c 'apt update && apt install tree psmisc lsof wget net-tools dnsutils tcpdump ngrep iputils-ping git -y'west와 east를 보면 클러스터 이름 그리고 sample service port를 제외하면 다른것은 없다.
kind create cluster --name east --image kindest/node:v1.33.2 --config - <<EOF
kind: Cluster
apiVersion: kind.x-k8s.io/v1alpha4
nodes:
- role: control-plane
  extraPortMappings:
  - containerPort: 31000 # sample apps
    hostPort: 31000
  - containerPort: 31001 # hubble ui
    hostPort: 31001
- role: worker
  extraPortMappings:
  - containerPort: 31002 # sample apps
    hostPort: 31002
networking:
  podSubnet: "10.1.0.0/16"
  serviceSubnet: "10.3.0.0/16"
  disableDefaultCNI: true
  kubeProxyMode: none
EOF
---
docker exec -it east-control-plane sh -c 'apt update && apt install tree psmisc lsof wget net-tools dnsutils tcpdump ngrep iputils-ping git -y'
docker exec -it east-worker sh -c 'apt update && apt install tree psmisc lsof wget net-tools dnsutils tcpdump ngrep iputils-ping git -y'2개의 클러스터 모두 1개의 control plane 과 1개의 worker 노드로 구성하며
cilium이 kube-proxy를 대체하기 위해서 kube-proxy 설치를 하지 않는다.(=kubeProxyMode: node)
그리고 kindnet이라는 cni를 설치하는데, cilium을 설치할 것이기 때문에 이것도 제외했다.(=disableDefaultCNI: true)
Cilium 설치
--- west cluster 설치 ---
cilium install --version 1.17.6 --set ipam.mode=kubernetes \
--set kubeProxyReplacement=true --set bpf.masquerade=true \
--set endpointHealthChecking.enabled=false --set healthChecking=false \
--set operator.replicas=1 --set debug.enabled=true \
--set routingMode=native --set autoDirectNodeRoutes=true --set ipv4NativeRoutingCIDR=10.0.0.0/16 \
--set ipMasqAgent.enabled=true --set ipMasqAgent.config.nonMasqueradeCIDRs='{10.1.0.0/16}' \
--set cluster.name=west --set cluster.id=1 \
--context kind-west

--- east cluster 설치 ---
cilium install --version 1.17.6 --set ipam.mode=kubernetes \
--set kubeProxyReplacement=true --set bpf.masquerade=true \
--set endpointHealthChecking.enabled=false --set healthChecking=false \
--set operator.replicas=1 --set debug.enabled=true \
--set routingMode=native --set autoDirectNodeRoutes=true --set ipv4NativeRoutingCIDR=10.1.0.0/16 \
--set ipMasqAgent.enabled=true --set ipMasqAgent.config.nonMasqueradeCIDRs='{10.0.0.0/16}' \
--set cluster.name=east --set cluster.id=2 \
--context kind-eastkind로 설치할 때 CNI를 제외했기 때문에 cilium을 설치해야 비로서 Node=Ready가 되며, Pod도 배포가 된다.
눈여겨봐야할 값은 ipv4NatvieRoutingCIDR와 nonMasqueradeCIDR이다.
ipv4NativeRoutingCIDR에는 본인 클러스터의 podCIDR를 설정한다.
이는 본인 클러스터의 podCIDR에 대해서는 direct route를 추가하겠다는 의미이다.
- direct route에는 본인 클러스터의 podCIDR를 등록해야 하고
- 그래서 배포하고 난 다음에 west 노드에서 라우팅 테이블을 보면 본인 클러스터에 대한 podCIDR만 커널 라우팅이 잡혀있다.
# ip -c route
default via 172.18.0.1 dev eth0
10.0.0.0/24 via 172.18.0.9 dev eth0 proto kernel
10.0.1.0/24 via 10.0.1.233 dev cilium_host proto kernel src 10.0.1.233
10.0.1.233 dev cilium_host proto kernel scope link
172.18.0.0/16 dev eth0 proto kernel scope link src 172.18.0.10그리고 nonMasqueradeCIDR에는 서로 다른 클러스터의 podCIDR 를 설정하는데,
이것은 서로 다른 클러스터의 podCIDR에 대해서는 NAT하지 않고 통신하겠다는것을 의미한다.
- nonMasqueradeCIDR에는 다른쪽 클러스터의 podCIDR를 등록해야한다.
- cluster mesh로 묶을 예정이기 때문에 다른 클러스터로 가는 목적지에 대해서 NAT를 하지 않기 위함이다.
그리고 cluster mesh를 위해서는 cilium 내부적으로 cluster name/id를 관리하는게 해당 값이 서로 다르다.

특이한점은 기존에 local에 kind로 사용하고 있는 클러스터가 있었는데.. west / east 에서 kube-apiserver timeout이 발생했다.
- 기존 클러스터를 삭제하니, west / east 클러스터에 이슈가 없어졌다.
Cilium Cluster Mesh
이름에서도 알 수 있듯이, 해당 기능은 cilium이 설치되어 있는 여러 클러스터를 묶어서 사용하는 기능을 말한다.
묶어서 사용한다는 의미는 pod-to-pod, service-to-service와 같은 통신에서 경계를 없애는 것을 의미한다.
위에 cilium을 설치할 때 native 모드로 설치하였고, ipmasq도 등록하였기 때문에 묶여있는 클러스터에서는 NAT를 하지 않는다.
의미만 보면 그럼 클러스터를 가용성 있게 사용할 수 있고, 부하분산도 되니깐 좋은것으로 보인다. 물론 좋다.
하지만 장점만 있는 구성은 없다. 반대로 mesh cluster간에 endpoint를 항상 동기화해야 하는 문제도 있고
그리고 데이터 동기화를 위해서 clustermesh-apiserver, etcd를 별도로 운영하는데 이에 대한 복잡성과 인증서 관리도 필요하다.
Cluster Mesh 설정 방법
cluster mesh는 인증서 동기화 -> mesh enabled -> mesh connect의 3개의 단계를 거쳐서 진행된다.
첫번째로 mesh cluster tls 인증서 동기화를 한다.
단점에서 말한것과 같이 mesh cluster간에 데이터 동기화를 위한 인증서를 동일하게 설정할 필요가 있다.
그리고 이는 west 클러스터의 인증서를 east 클러스터를 그대로 복사해서 사용한다.
kubectl --context kind-east get secret -n kube-system cilium-ca
kubectl --context kind-east delete secret -n kube-system cilium-ca

kubectl --context kind-west get secret -n kube-system cilium-ca -o yaml | \
kubectl --context kind-east create -f -두번째로 mesh를 위해 mesh 활성화를 하는데, mesh는 cilium cli을 통해서 쉽게 설정할 수 있다.
mesh를 하게되면 service/endpoint 동기화를 위해서 clustermesh-apiserver가 생성되는데 이를 node port로 설정한다.
그리고 동기화된 정보를 etcd에 저장하지 않고 apiserver 호출로 동기화하기 위해 kvstoremesh는 falas로 설정한다.
cilium clustermesh enable --service-type NodePort --enable-kvstoremesh=false --context kind-west
cilium clustermesh enable --service-type NodePort --enable-kvstoremesh=false --context kind-eastenable을 하게 되면 clustermesh-apiserver가 신규로 배포가 된다. 물론 service는 node port로 노출이 되어있다.
하지만 우측에 있는 화면처럼 enable만 했을뿐 아직 no cluster connected 뜨고, 이제 mesh 연결을 해줘야한다.

마지막 세번째로 mesh connect를 한다.
cilium clustermesh connect --context kind-west --destination-context kind-east

--- mesh cluster 상태 확인
cilium clustermesh status --context kind-west --wait
cilium clustermesh status --context kind-east --waitculstermesh connect 커맨드를 실행하고 시간이 지나면 아래 그림처럼 2개의 클러스터가 연결된 모습을 볼 수 있다.

cilium status에서도 1개의 remote cluster와 mesh 연결이 되어 있는 모습을 볼 수 있다.
kwest exec -it -n kube-system ds/cilium -- cilium status --verbose
'''
ClusterMesh:   1/1 remote clusters ready, 0 global-services
   east: ready, 2 nodes, 5 endpoints, 5 identities, 0 services, 0 MCS-API service exports, 0 reconnections (last: never)
   └  etcd: 1/1 connected, leases=0, lock leases=0, has-quorum=true: endpoint status checks are disabled, ID: 4044bd2d6481267d
   └  remote configuration: expected=true, retrieved=true, cluster-id=2, kvstoremesh=false, sync-canaries=true, service-exports=disabled
   └  synchronization status: nodes=true, endpoints=true, identities=true, services=true
   '''
그리고 최종적으로 cluster mesh의 config를 확인할 수 있는데,
그리고 mesh config에서 파일 경로는 secrets 객체로 관리하고 있고, 실제 파일은 cilium-agent 내에 존재한다.
kubectl exec -it -n kube-system ds/cilium -c cilium-agent --context kind-west -- cilium-dbg troubleshoot clustermesh
kubectl exec -it -n kube-system ds/cilium -c cilium-agent --context kind-east -- cilium-dbg troubleshoot clustermesh
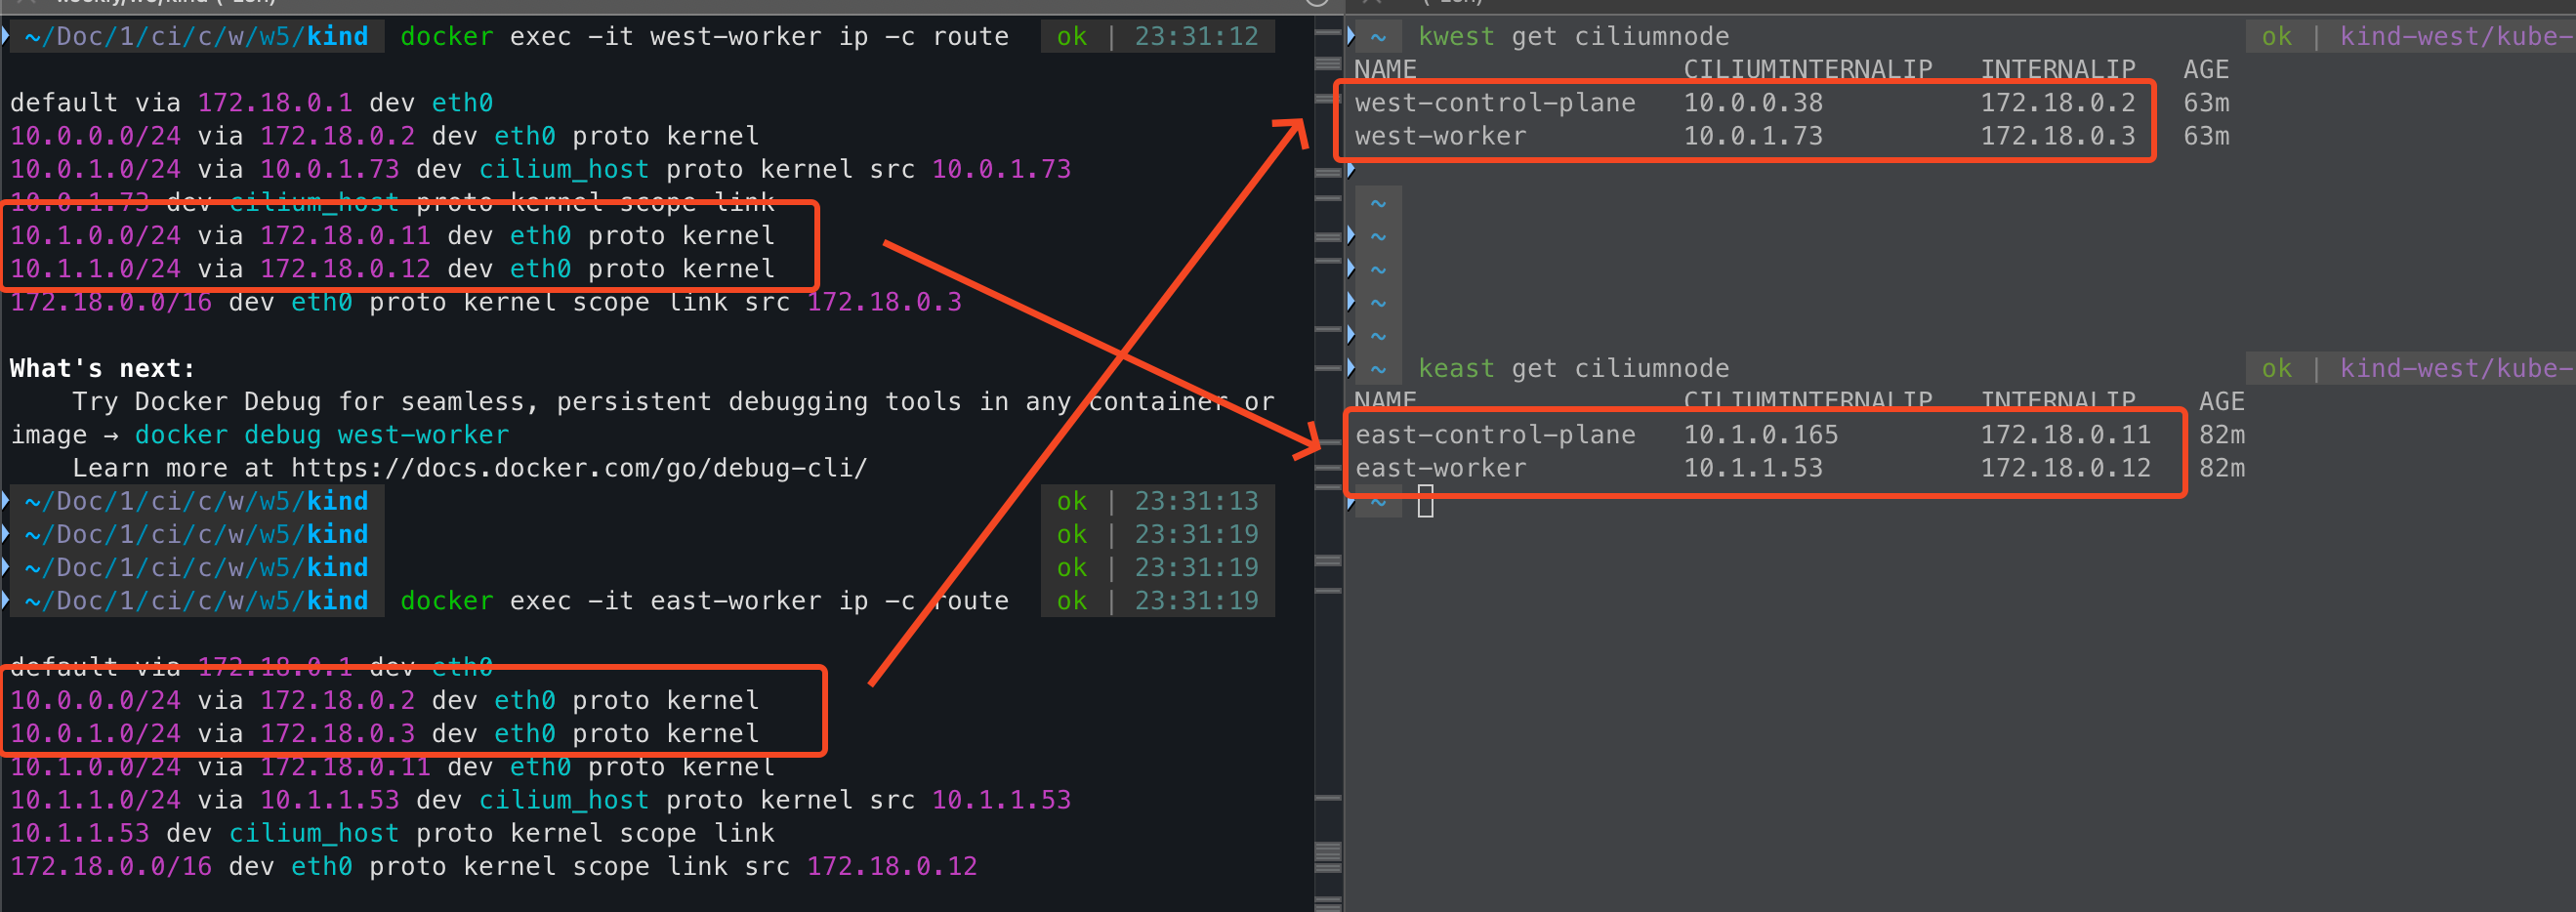
cluster mesh를 하기 전/후 가장 큰 차이점은 라우팅 테이블의 변화이다.
--- west 클러스터의 worker 노드
# ip -c route
default via 172.18.0.1 dev eth0
10.0.0.0/24 via 172.18.0.9 dev eth0 proto kernel
10.0.1.0/24 via 10.0.1.233 dev cilium_host proto kernel src 10.0.1.233
10.0.1.233 dev cilium_host proto kernel scope link
172.18.0.0/16 dev eth0 proto kernel scope link src 172.18.0.10mesh를 하기 이전에는 west에서 east의 정보를 알 수 없었기 때문에 east podCIDR에 대한 라우팅이 없었다.
하지만 mesh를 하고 난 다음에는 weast, east는 서로 연결된 상대방 클러스터에 대한 podCIDR를 노드 IP로 라우팅 설정이 되어 있다.
Cluster Mesh 네트워크 통신 확인
hubble을 이용하면 시각화해서 통신 흐름을 볼 수 있기 때문에 hubble을 활성화해서 활용한다.
--- west hubble enable
helm upgrade cilium cilium/cilium --version 1.17.6 --namespace kube-system --reuse-values \
--set hubble.enabled=true --set hubble.relay.enabled=true --set hubble.ui.enabled=true \
--set hubble.ui.service.type=NodePort --set hubble.ui.service.nodePort=30001 --kube-context kind-west
kwest -n kube-system rollout restart ds/cilium

--- east hubble enable
helm upgrade cilium cilium/cilium --version 1.17.6 --namespace kube-system --reuse-values \
--set hubble.enabled=true --set hubble.relay.enabled=true --set hubble.ui.enabled=true \
--set hubble.ui.service.type=NodePort --set hubble.ui.service.nodePort=31001 --kube-context kind-east
kwest -n kube-system rollout restart ds/ciliumpod-to-pod 통신
각 클러스터에 테스트를 위한 sample app을 배포한다.
cat << EOF | kubectl apply --context kind-west -f -
apiVersion: v1
kind: Pod
metadata:
  name: curl-pod
  labels:
    app: curl
spec:
  containers:
  - name: curl
    image: nicolaka/netshoot
    command: ["tail"]
    args: ["-f", "/dev/null"]
  terminationGracePeriodSeconds: 0
EOF

cat << EOF | kubectl apply --context kind-east -f -
apiVersion: v1
kind: Pod
metadata:
  name: curl-pod
  labels:
    app: curl
spec:
  containers:
  - name: curl
    image: nicolaka/netshoot
    command: ["tail"]
    args: ["-f", "/dev/null"]
  terminationGracePeriodSeconds: 0
EOFwest -> east curl-pod로 icmp를 날려보면, east cluster에서 NAT 없이 통신이 되는걸 확인할 수 있다.
이는 cilium을 설치할 때 native 모드로 설치했고, non masqurade cidr를 west / east podCIDR로 설정했기 때문에 NAT가 없다.
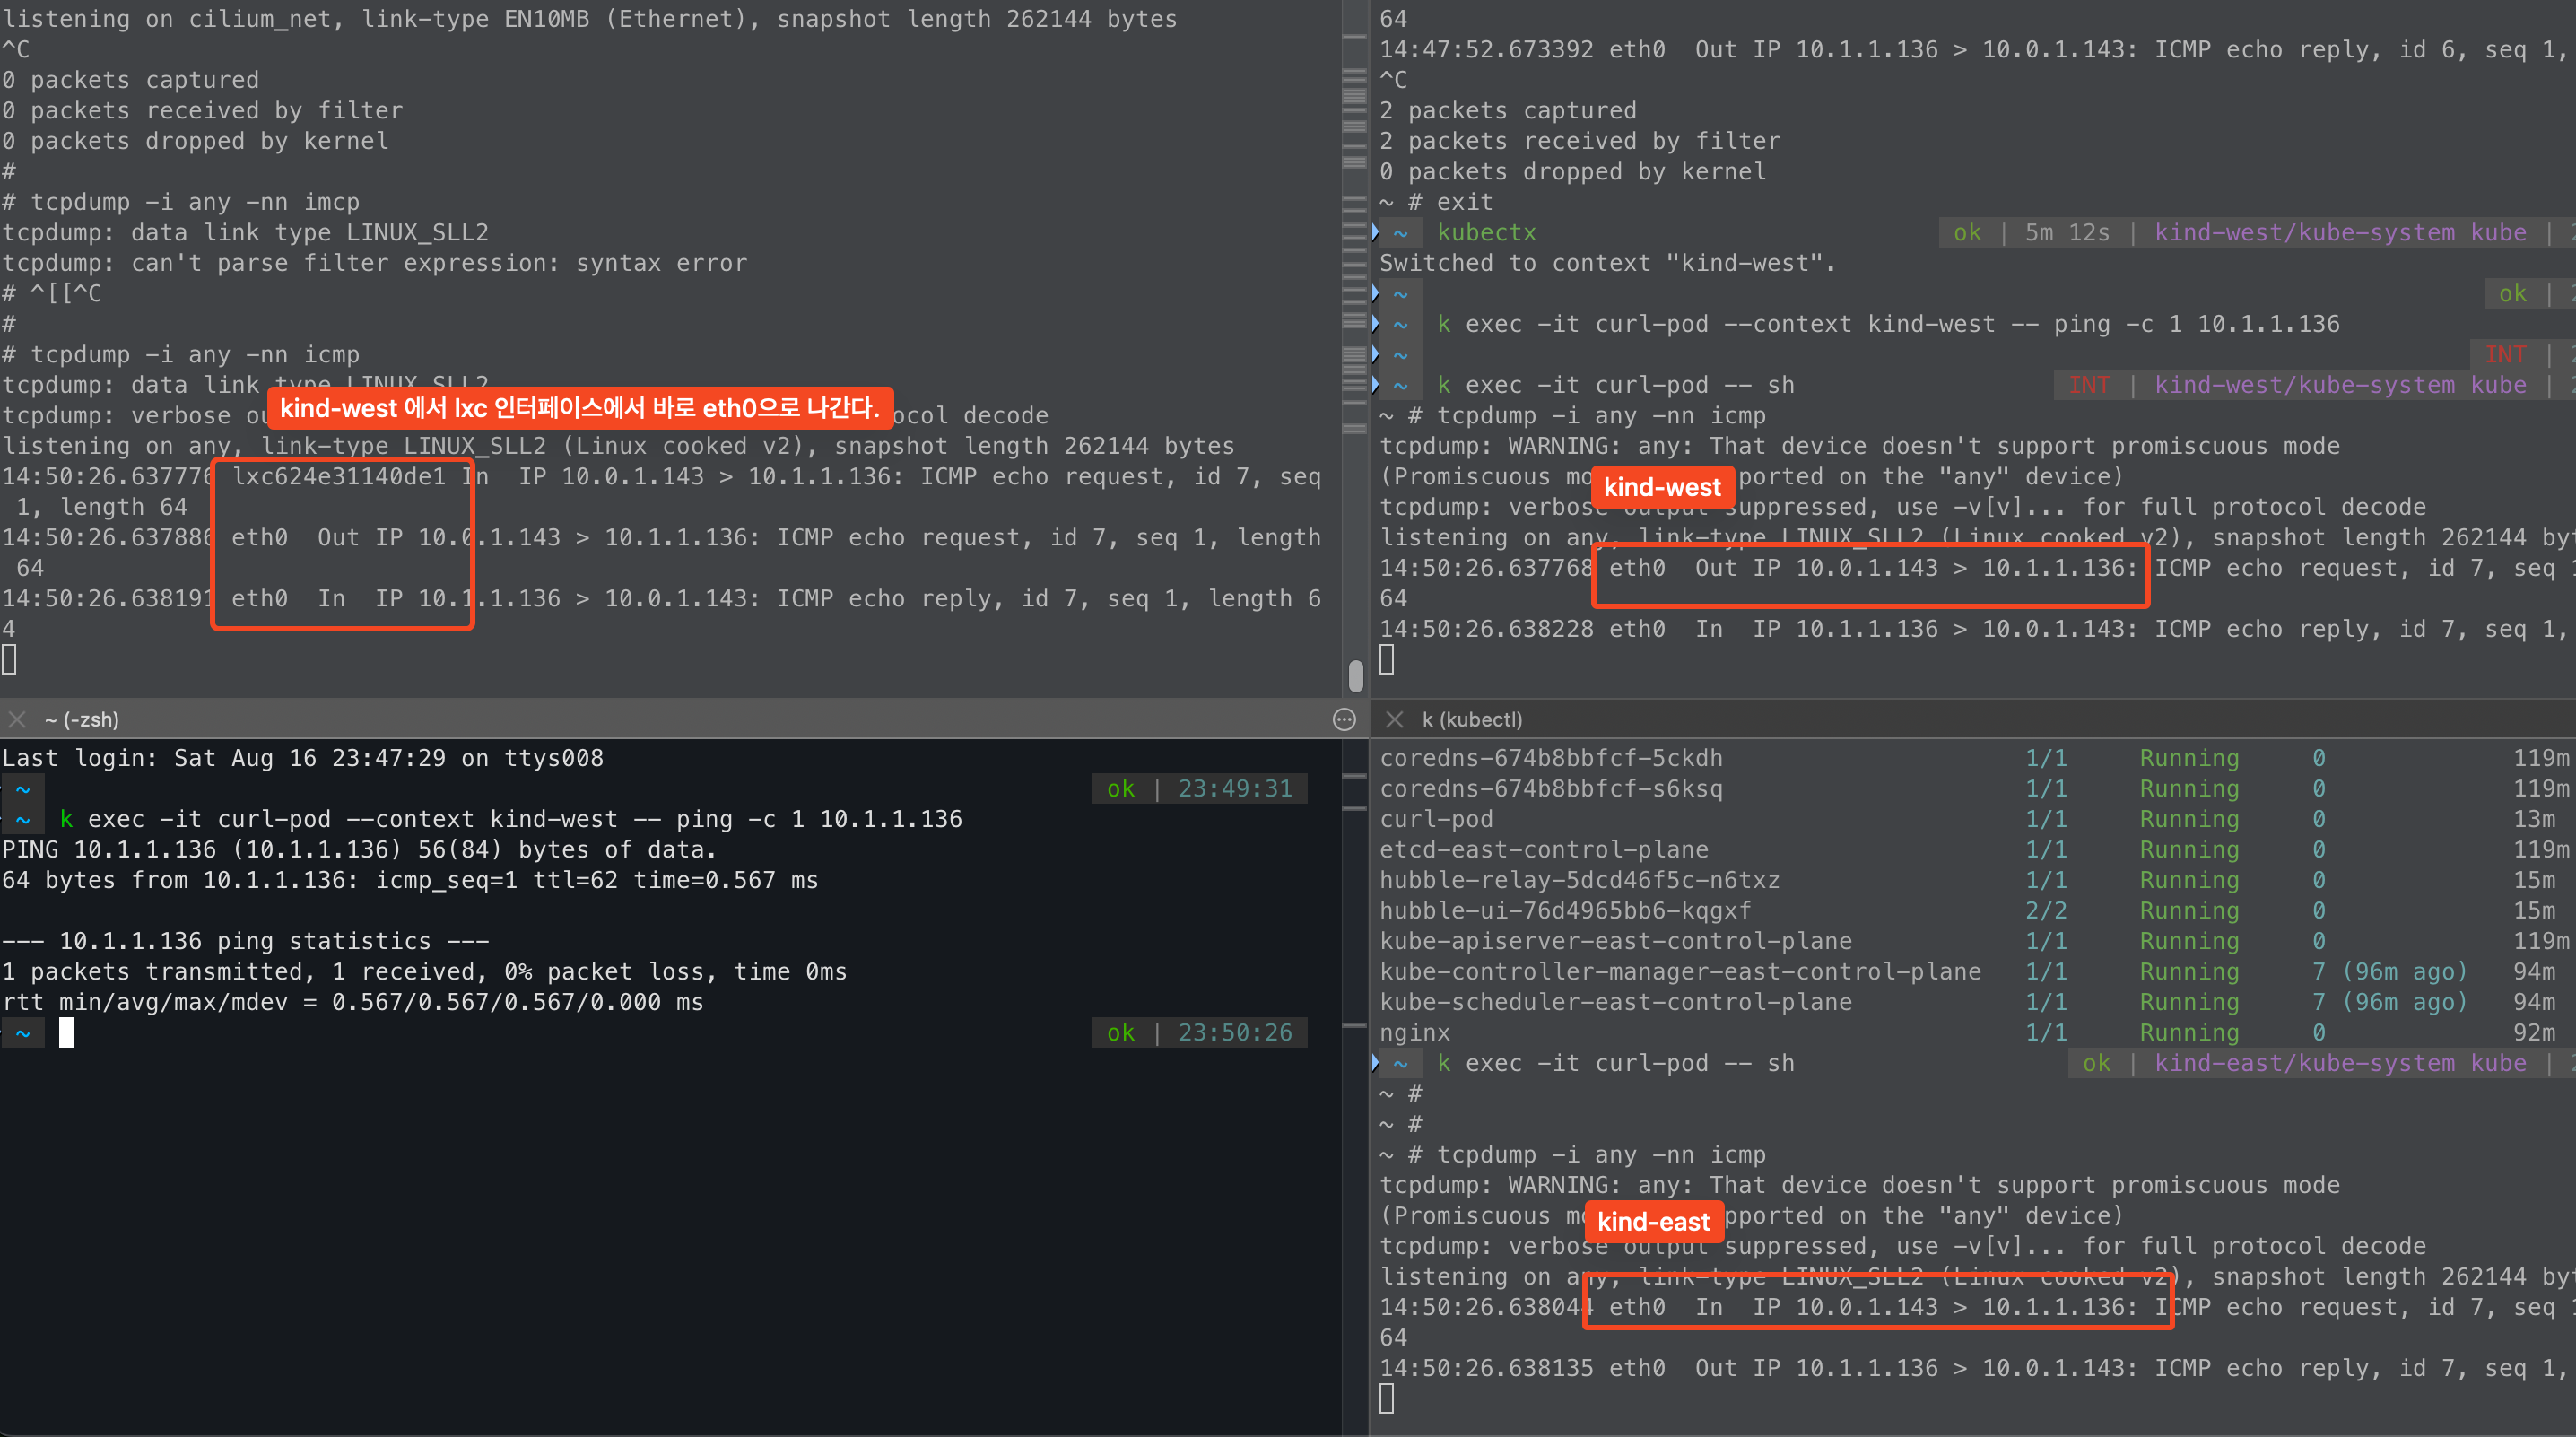
그리고 hubble을 봤을때도 지금까지 볼 수 없었던 clsuter name이 있다.
cluster mesh를 했기 때문에 보여지는 정보이다.

service-to-service 통신(None Local Annotation)
각 클러스터에서 sample app을 배포한다.
cat << EOF | kubectl apply --context kind-west -f -
apiVersion: apps/v1
kind: Deployment
metadata:
  name: webpod
spec:
  replicas: 2
  selector:
    matchLabels:
      app: webpod
  template:
    metadata:
      labels:
        app: webpod
    spec:
      affinity:
        podAntiAffinity:
          requiredDuringSchedulingIgnoredDuringExecution:
          - labelSelector:
              matchExpressions:
              - key: app
                operator: In
                values:
                - sample-app
            topologyKey: "kubernetes.io/hostname"
      containers:
      - name: webpod
        image: traefik/whoami
        ports:
        - containerPort: 80
---
apiVersion: v1
kind: Service
metadata:
  name: webpod
  labels:
    app: webpod
  annotations:
    service.cilium.io/global: "true"
spec:
  selector:
    app: webpod
  ports:
  - protocol: TCP
    port: 80
    targetPort: 80
  type: ClusterIP
EOF


#
cat << EOF | kubectl apply --context kind-east -f -
apiVersion: apps/v1
kind: Deployment
metadata:
  name: webpod
spec:
  replicas: 2
  selector:
    matchLabels:
      app: webpod
  template:
    metadata:
      labels:
        app: webpod
    spec:
      affinity:
        podAntiAffinity:
          requiredDuringSchedulingIgnoredDuringExecution:
          - labelSelector:
              matchExpressions:
              - key: app
                operator: In
                values:
                - sample-app
            topologyKey: "kubernetes.io/hostname"
      containers:
      - name: webpod
        image: traefik/whoami
        ports:
        - containerPort: 80
---
apiVersion: v1
kind: Service
metadata:
  name: webpod
  labels:
    app: webpod
  annotations:
    service.cilium.io/global: "true"
spec:
  selector:
    app: webpod
  ports:
  - protocol: TCP
    port: 80
    targetPort: 80
  type: ClusterIP
EOF중요한것은 service annotation이다. annotation을 service.cilium.io/global: true로 설정한다.
이는 cluster mesh에서 각 클러스터에 배포되어 있는 서비스를 단일 클러스터처럼 트래픽을 받기 위한 설정이다.
실제로 west 클러스터에서 cilium service list를 보면 west 와 east의 동일한 svc에 대한 endpoint가 모두 등록되어 있다.
kwest exec -it -n kube-system ds/cilium -c cilium-agent -- cilium service list --clustermesh-affinity
그렇다면 cilium에서는 어떤정보를 기준으로 service/endpoint 동기화를 진행할까?
cilium에서는 namesspace + service name이 동일하면 동일한 서비스로 간주하고 endpoint를 간주한다.
그러나.. 한가지 문제점이 또 있다. west 클러스터에 있는 curl-pod에서 webpod service를 호출하면,
west / east 클러스터의 service가 모두 호출을 한다. 그리고 분산 비율도 보면 골고루 분산이 되는것처럼 보인다.
for i in {1..100}; do
  kubectl exec -i curl-pod --context kind-west -- sh -c "curl -s --connect-timeout 1 webpod | grep Hostname" done | sort | uniq -c | sort -nr

---
  31 Hostname: webpod-697b545f57-rcp4r
  29 Hostname: webpod-697b545f57-jjpz9
  23 Hostname: webpod-697b545f57-gkh6r
17 Hostname: webpod-697b545f57-75q89client - server의 관점에서 볼 때 server가 같은 cluster에 존재하는데도, 거리가 먼 remote cluster를 호출하는것이다.
이는 네트워크 지연 관점에서도, 네트워크 대역폭 관점에서도 좋지 않기 때문에 같은 cluster를 호출하는것이 좋다.

service-to-service 통신(affinity=local)
BGP 실습할때도 비슷하게, 노드에 서비스가 없음에도 광고를 해서 불필요한 네트워크 홉이 늘어나는 문제가 있었다.
cilium에서는 이러한 문제를 해결하기 위해서 service에서 우선적으로 호출한다는 개념을 적용하였다.
설정하는 방법은 service annotation에 추가만 하면 된다.
kwest annotate service webpod service.cilium.io/affinity=local --overwrite
keast annotate service webpod service.cilium.io/affinity=local --overwrite해당 annotation은 traffic policy에서 local로 설정하는것과 유사하게 같은 노드에 있는 서비스를 우선하는 preferred 값이 생긴다.

cilium affinity local을 설정하고 나서, 각 cluster에서 service를 호출하게 되면 각 cluster가 우선적으로 전달된다.
- cloud 환경에서는 대역폭에 대한 과금요소도 엄청나다.
- 그래서 같은 AZ에서만 호출하도록 하는것이 중요한 설정인데, mesh를 하게 되면 affinity local도 필수 설정일것 같다.

service list에서 preferred, 즉 선호한다는 뜻이다.
그렇기 때문에 같은 cluster에 endpoint가 없으면 다른 cluster로 전달이 되어 서비스에 영향은 없다.

그리고 이런 경우는 없겠지만, 다른 cluster service 호출을 우선하도록 설정도 가능하다.
같은 cluster 우선은 local, 다른 cluster 우선은 remote이다.
kwest annotate service webpod service.cilium.io/affinity=remote --overwrite
keast annotate service webpod service.cilium.io/affinity=remote --overwrite

--- east endpoint가 우선이다.
kwest exec -it -n kube-system ds/cilium -c cilium-agent -- cilium service list --clustermesh-affinity

ID   Frontend                Service Type   Backend
13   10.2.47.149:80/TCP      ClusterIP      1 => 10.1.1.190:80/TCP (active)
                                            2 => 10.1.1.41:80/TCP (active)
                                            3 => 10.0.1.46:80/TCP (active) (preferred)
4 => 10.0.1.219:80/TCP (active) (preferred)그리고 또, endpoint 동기화를 하지 않도록 하는것도 가능하며, 이는 각 cluster별로 설정이 가능하다.
kwest annotate service webpod service.cilium.io/shared=false

--- east에서 west endpoint가 없어졌다.
keast exec -it -n kube-system ds/cilium -c cilium-agent -- cilium service list --clustermesh-affinity

ID   Frontend                Service Type   Backend
13   10.3.105.173:80/TCP     ClusterIP      1 => 10.1.1.190:80/TCP (active) (preferred)
2 => 10.1.1.41:80/TCP (active) (preferred)내가 생각했을때 mesh cluster를 하면 아래와 같이 service annotation으로 설정하는게 좋을것 같다.
그러면 service간 endpoint 동기화도 가능하고, cluster에서 호출하는 service가 cluster 내부를 우선하도록 하는것이다.
apiVersion: v1
kind: Service
metadata:
  annotations:
    service.cilium.io/affinity: local
    service.cilium.io/global: "true"
    service.cilium.io/shared: "true"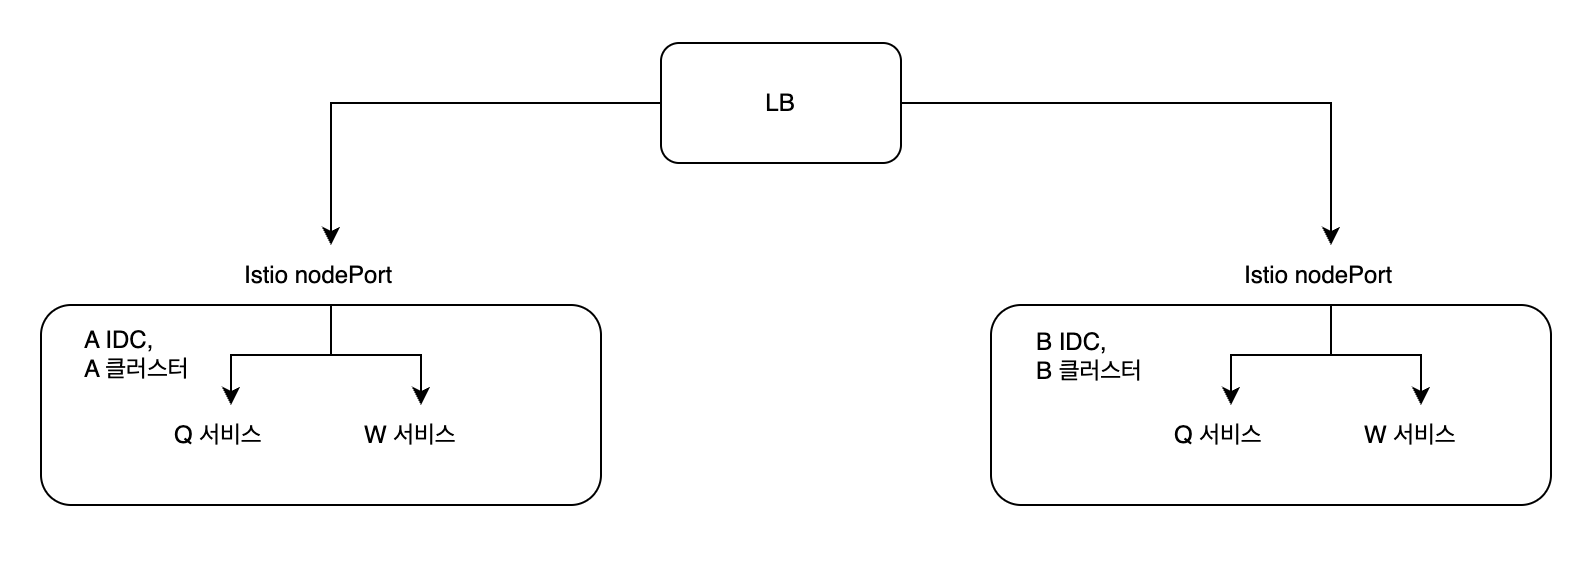
'''현재 회사에서는 mesh cluster는 아니지만, mesh처럼 동작하고자 아래와 같이 LB에서 RR로 분산을 해준다.
하지만 이는 mesh로 볼수가 없다.. 특히 service-to-service에서는 회사 정책이 service dns가 아니라 domain 기반 호출이 정책이다.
그렇기 때문에 A 클러스터에서 Q 서비스가 W 서비스를 호출할 때 다시 LB를 거치게 되고, 이때 50%는 다른 B 클러스터로 전달이 된다.
네트워크 지연과 대역폭에 영향을 주고, 특히나 홉이 많아지게 되면서 Packet drop에 대한 확률도 커질것 같다.
현재는 cilium을 CNI로 사용하고 있지만, 이전에는 calico를 사용하고 있었고 비슷하게 구현을 할 수 있는것으로 알고있다.
하지만 cilium 과는 다르게 설정하는 방법도 다르고 endpoint 동기화도 미흡한걸로 알고있다.
HA 구성을 위해 단일 클러스터가 아닌 다중 클러스터를 사용하는 환경이 많아짐에 따라서
같은 클러스터의 서비스를 호출하도록 하는것이 중요한게 cilium mesh cluster가 좋은 답안지를 제시해주는것 같다.

'기술 토론장 > [K8s] Kubernetes' 카테고리의 다른 글
| [Cilium][6주차] Service Mesh Gateway API Support (1) | 2025.08.23 |
|---|---|
| [Cilium][6주차] Service Mesh Ingress Support (1) | 2025.08.23 |
| [Cilium][5주차] Cilium native + BGP 활용 (2) | 2025.08.16 |
| [Cilium][4주차] Node & Pod 네트워크 통신, Service External-IP 활용 (1) | 2025.08.10 |
| [Cilium][4주차] Node & Pod 네트워크 통신, Native vs VXLAN (6) | 2025.08.09 |