cilium에서는 envoy를 이용해서 L7 제어를 할 수 있다.
service mesh에서 path, method, header 등으로 backend를 제어하는것도 모두 cilium-envoy에서 필터링하는것이며
cilium-envoy는 이름에서 알 수 있듯이 envoy를 cilium에서 사용할 수 있도록 매핑한것이며 보통 L7 제어를 한다.
- L7 제어를 하면 hubble에서도 path 등의 정보를 볼 수 있다.
Cilium L7 Aware Traffic Management
envoy 기반으로 L7 트래픽 제어를 하는것이다. CiliumEnvoyConfig, CiliumClusterwideEnvoyConfig를 사용한다.
그리고 istio와 동일하게 envoy config를 사용하는것은 매우매우 어렵고 복잡하다. 그리고 모든 envoy 기능을 사용할 수도 없다.
- 이전 회사에서도 envoy config 사용해서 특정 header를 추가하거나, 대체하거나 했는데 envoy가 상당히 불친절하다.
- config를 잘못 넣었는데 error가 발생하지도 않고 config 유효성 검사도 거의 이뤄지지 않아서 사용하기가 아주 어려웠다.
L7 Aware Traffic 사전 작업
envoyConfig와 loadBalancer.l7.backend를 활성화하는것이 전제조건이다.
helm upgrade cilium cilium/cilium --version 1.18.1 --namespace kube-system --reuse-values \
--set ingressController.enabled=true --set gatewayAPI.enabled=false \
--set envoyConfig.enabled=true --set loadBalancer.l7.backend=envoyhelm으로 배포한 다음에 cilium operator를 포함해서 cilium, cilium-envoy를 재시작하면 설정이 반영된다.
--- values 변경하고 재시작 하면 ---
kubectl -n kube-system rollout restart deployment/cilium-operator
kubectl -n kube-system rollout restart ds/cilium
kubectl -n kube-system rollout restart ds/cilium-envoy


--- load balancer l7에 envoy로 반영되어 있다 ---
(⎈|HomeLab:kube-system) root@k8s-ctr:~# cilium config view |grep -i envoy
enable-envoy-config                               true
envoy-access-log-buffer-size                      4096
envoy-base-id                                     0
envoy-config-retry-interval                       15s
envoy-keep-cap-netbindservice                     false
envoy-secrets-namespace                           cilium-secrets
external-envoy-proxy                              true
loadbalancer-l7 envoy그리고 테스트를 위해서 테스트 앱을 배포한다.
- echo service를 nodeport로 노출해서 cliemt -> echo service로 요청하는 테스트이다.
--- 샘플 테스트 앱 배포 ---
kubectl apply -f https://raw.githubusercontent.com/cilium/cilium/1.18.1/examples/kubernetes/servicemesh/envoy/test-application.yaml


--- 샘플 테스트 앱 확인 ---
(⎈|HomeLab:kube-system) root@k8s-ctr:~# kubectl get -f https://raw.githubusercontent.com/cilium/cilium/1.18.1/examples/kubernetes/servicemesh/envoy/test-application.yaml
NAME                          DATA   AGE
configmap/coredns-configmap   1      62s

NAME                             READY   UP-TO-DATE   AVAILABLE   AGE
deployment.apps/client           1/1     1            1           61s
deployment.apps/client2          1/1     1            1           61s
deployment.apps/echo-service-1   1/1     1            1           61s
deployment.apps/echo-service-2   1/1     1            1           61s

NAME                     TYPE       CLUSTER-IP      EXTERNAL-IP   PORT(S)          AGE
service/echo-service-1   NodePort   10.96.104.176   <none>        8080:30526/TCP   61s
service/echo-service-2 NodePort 10.96.55.217 <none> 8080:31434/TCP 61s이제 cilium docs에서 제공해주고 있는 예시 샘플을 해보자.
L7 Load Balancing
가장 기본이 되는 기능이다.
client2 -> echo-service-1, -2로 나가는 트래픽 중에서 GET method + "/" 경로만 허용하는 정책을 적용한다.
- client, echo-service는 모두 labels을 가지고 있으므로, 해당 label로 제어를 한다.
- 서비스 이름으로 호출을 하기 때문에 cnp에서 coredns로 나가는 트래픽은 허용해야 한다.
kind: CiliumNetworkPolicy
metadata:
  name: client-egress-l7-http
spec:
  description: "Allow GET one.one.one.one:80/ and GET <echo>:8080/ from client2"
  endpointSelector:
    matchLabels:
      other: client
  egress:
    - toEndpoints:
        - matchLabels:
            k8s:kind: echo
      toPorts:
        - ports:
            - port: "8080"
              protocol: TCP
          rules:
            http:
              - method: "GET"
                path: "/"
    # Allow GET / requests, only towards one.one.one.one.
    - toFQDNs:
        - matchName: "one.one.one.one"
      toPorts:
        - ports:
            - port: "80"
              protocol: TCP
          rules:
            http:
              - method: "GET"
                path: "/"
---
kind: CiliumNetworkPolicy
metadata:
  name: client-egress-only-dns
spec:
  endpointSelector:
    matchLabels:
      kind: client
  egress:
    - toPorts:
        - ports:
            - port: "53"
              protocol: ANY
          rules:
            dns:
              - matchPattern: "*"
      toEndpoints:
        - matchLabels:
            k8s:io.kubernetes.pod.namespace: kube-system
            k8s:k8s-app: kube-dns
        - matchLabels:
            k8s:io.kubernetes.pod.namespace: kube-system
k8s:k8s-app: corednscurl로 테스트를 해보면 cnp로 지정한 get method + "/" 경로에 대해서만 통신이 가능하다.
--- Path가 / + GET Method 이므로 허용
kubectl exec -it $CLIENT2 -- curl -v echo-service-1:8080/

--- Path가 foo 이기 때문에 DROP ---
kubectl exec -it $CLIENT2 -- curl -v echo-service-2:8080/foo

--- POST Method 라서 DROP ---
kubectl exec -it $CLIENT2 -- curl -X POST -v echo-service-1:8080/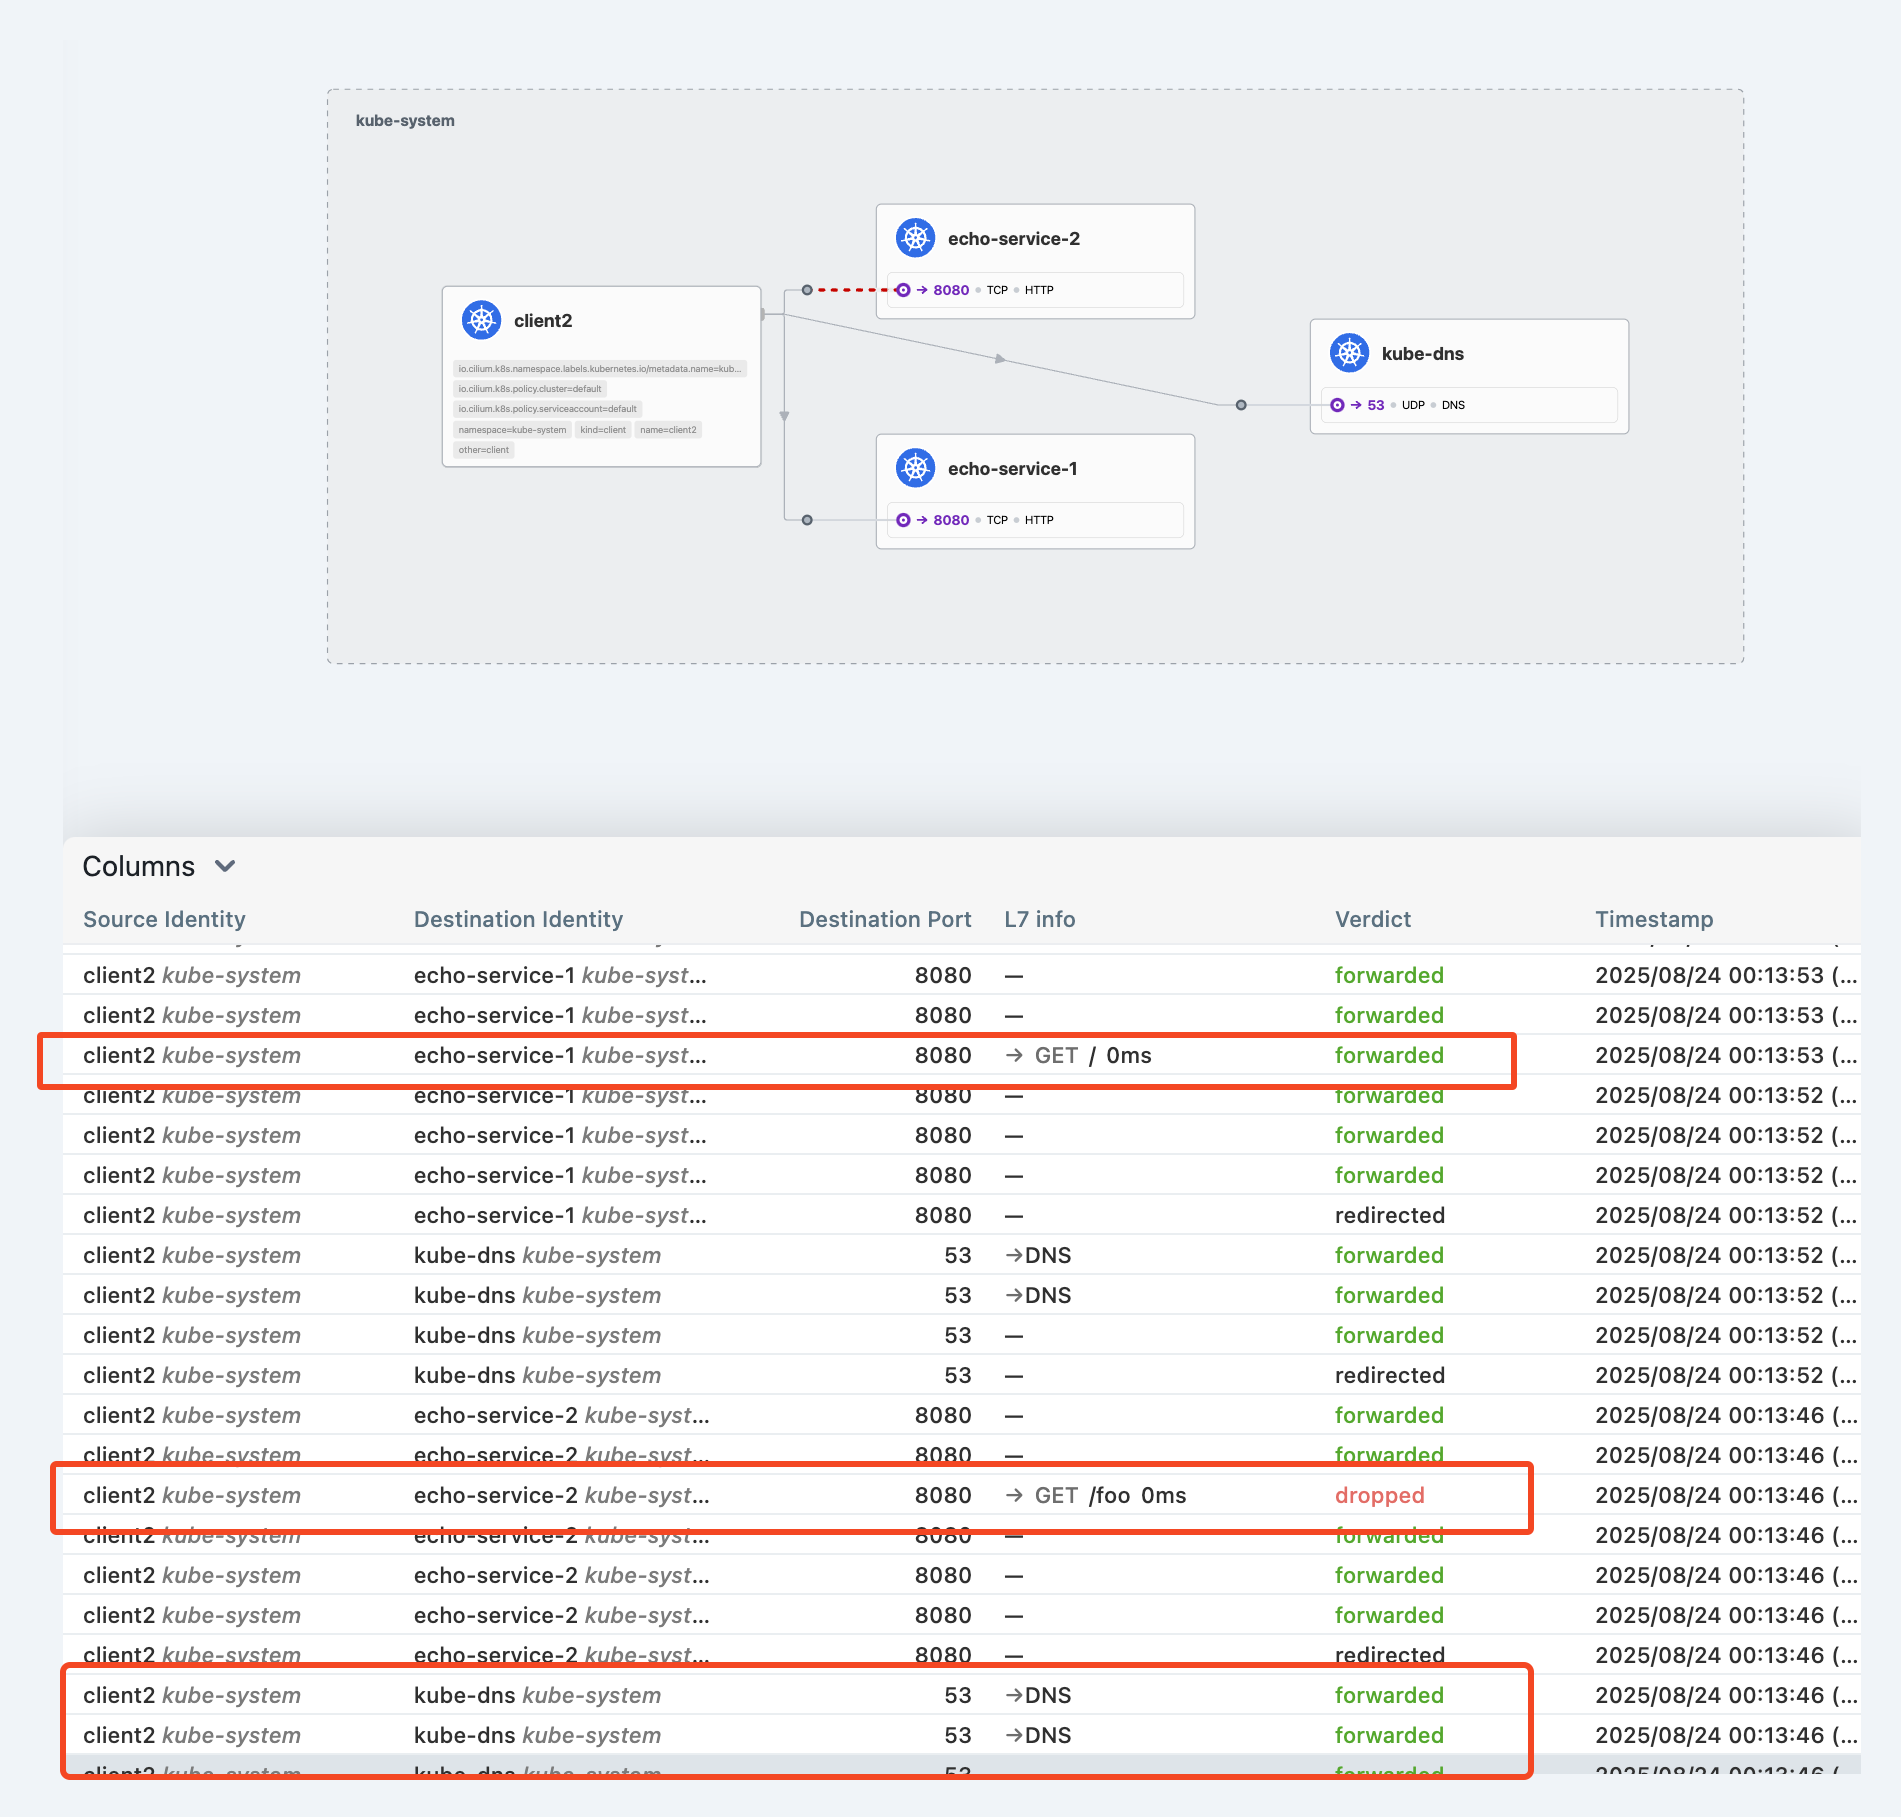
L7 URL re-writing
l7 path 경로를 대체하는것이다. nginx에서는 rewrite로 쉽게 가능한대.. envoy는 아주아주 복잡하다..
echo-service-1, -2를 50:50 가중치로 분배하고, 라운드로빈으로 분배하고, "/foo" 경로는 "/" 경로로 대체하는것이다.
- 개인적으로.. envoy config는 거의 사용이 불가능하다고 생각하다. 너무 복잡하다.
--- cilium cluster wide envoy config 배포 ---
kubectl apply -f https://raw.githubusercontent.com/cilium/cilium/1.18.1/examples/kubernetes/servicemesh/envoy/envoy-traffic-management-test.yaml

--- envoy config 확인 ---
  spec:
    resources:
    - '@type': type.googleapis.com/envoy.config.listener.v3.Listener
      filter_chains:
      - filters:
        - name: envoy.filters.network.http_connection_manager
          typed_config:
            '@type': type.googleapis.com/envoy.extensions.filters.network.http_connection_manager.v3.HttpConnectionManager
            http_filters:
            - name: envoy.filters.http.router
              typed_config:
                '@type': type.googleapis.com/envoy.extensions.filters.http.router.v3.Router
            rds:
              route_config_name: lb_route
            skip_xff_append: true
            stat_prefix: envoy-lb-listener
            use_remote_address: true
      name: envoy-lb-listener
    - '@type': type.googleapis.com/envoy.config.route.v3.RouteConfiguration
      name: lb_route
      virtual_hosts:
      - domains:
        - '*'
        name: lb_route
        routes:
        - match:
            prefix: /
          route:
            regex_rewrite:
              pattern:
                google_re2: {}
                regex: ^/foo.*$
              substitution: /
            retry_policy:
              num_retries: 3
              per_try_timeout: 1s
              retry_on: 5xx
            weighted_clusters:
              clusters:
              - name: kube-system/echo-service-1
                weight: 50
              - name: kube-system/echo-service-2
                weight: 50
    - '@type': type.googleapis.com/envoy.config.cluster.v3.Cluster
      connect_timeout: 5s
      lb_policy: ROUND_ROBIN
      name: kube-system/echo-service-1
      outlier_detection:
        consecutive_local_origin_failure: 2
        split_external_local_origin_errors: true
      type: EDS
    - '@type': type.googleapis.com/envoy.config.cluster.v3.Cluster
      connect_timeout: 3s
      lb_policy: ROUND_ROBIN
      name: kube-system/echo-service-2
      outlier_detection:
        consecutive_local_origin_failure: 2
        split_external_local_origin_errors: true
      type: EDS
    services:
    - name: echo-service-1
      namespace: kube-system
    - name: echo-service-2
namespace: kube-system"/foo" 경로로 요청했지만 backend에는 "/" 경로로 처리하고 hubble 에서도 동일하다.

L7 Circuit Breaking
circuit breaking은 istio도 제공해주는 기능이다. 쉽게 말하면 backend가 장애가 발생하면, 장애가 확산되지 않도록 일부를 차단한다.
그럼 여기서.. 약간 애매한 부분이 생길 수 있다. backend가 장애가 난다고 해서, 요청을 차단하면 어차피 장애가 아닌가?
circuit breaking은 말 그대로 장애 확산을 방지하는 것이다.
만약 cricuit breaking이 없다면 backend는 모든 요청을 계속 받게 되고 CPU, Memory 과점유, connection pool 문제가 생긴다.
하지만 존재한다면 일부 요청은 차단되겠지만 리소스가 과점유하거나 connection pool에 문제가 생기는것은 방지할 수 있다.
대를 위해 소를 희생하는것이다.
--- 테스트 앱 배포 ---
kubectl apply -f https://raw.githubusercontent.com/cilium/cilium/1.18.1/examples/kubernetes/servicemesh/envoy/test-application-proxy-circuit-breaker.yaml

--- circuit breaking ccec를 배포 ---
kubectl apply -f https://raw.githubusercontent.com/cilium/cilium/1.18.1/examples/kubernetes/servicemesh/envoy/envoy-circuit-breaker.yaml

--- ccec 를 확인하면 ---
'''
    - '@type': type.googleapis.com/envoy.config.cluster.v3.Cluster
      circuit_breakers:
        thresholds:
        - max_pending_requests: 1 #1개 요청에 대해서만 대기한다.
          max_requests: 2 # 2개 요청에 대해서만 처리하고
          priority: DEFAULT
      connect_timeout: 5s
      edsClusterConfig:
        serviceName: default/echo-service
      lb_policy: ROUND_ROBIN
      name: default/echo-service
      outlier_detection:
        consecutive_local_origin_failure: 2
        split_external_local_origin_errors: true
      type: EDS
    services:
    - name: echo-service
      namespace: default
그리고 curl 커맨드에서 -P로 동시성을 조정하면 조정에 따라서 circuit breaking이 발동 될때가 있고, 안될때가 있다.
- P가 동시에 처리하는 에이전트 개수이기 때문에, 크면 클수록 503 응답의 비율이 높아진다.
--- P 값을 조정하면 동시성 조정이 가능 ---
kubectl exec -it curl-pod -- sh -c "seq 1 20 | xargs -n1 -P5 -I{} curl -s -o /dev/null -w '%{http_code}\n' http://echo-service:8080" |sort |uniq -c
L7 Traffic Shifting
envoy를 통해서 서비스에 대한 트래픽 비율을 조정하는것이다. gateway api에서도 httproute crd를 통해서 비율 조정이 가능했다.
그리고 이 기능또한 istio destinationrule + virtualservice의 조합으로 트래픽 조정이 가능하다.
이걸 cilium에서 지원하는것이다. 사실 istio, cilium 모두 envoy를 사용하기 때문에 cilium에서 지원한다고 보기 애매하다..
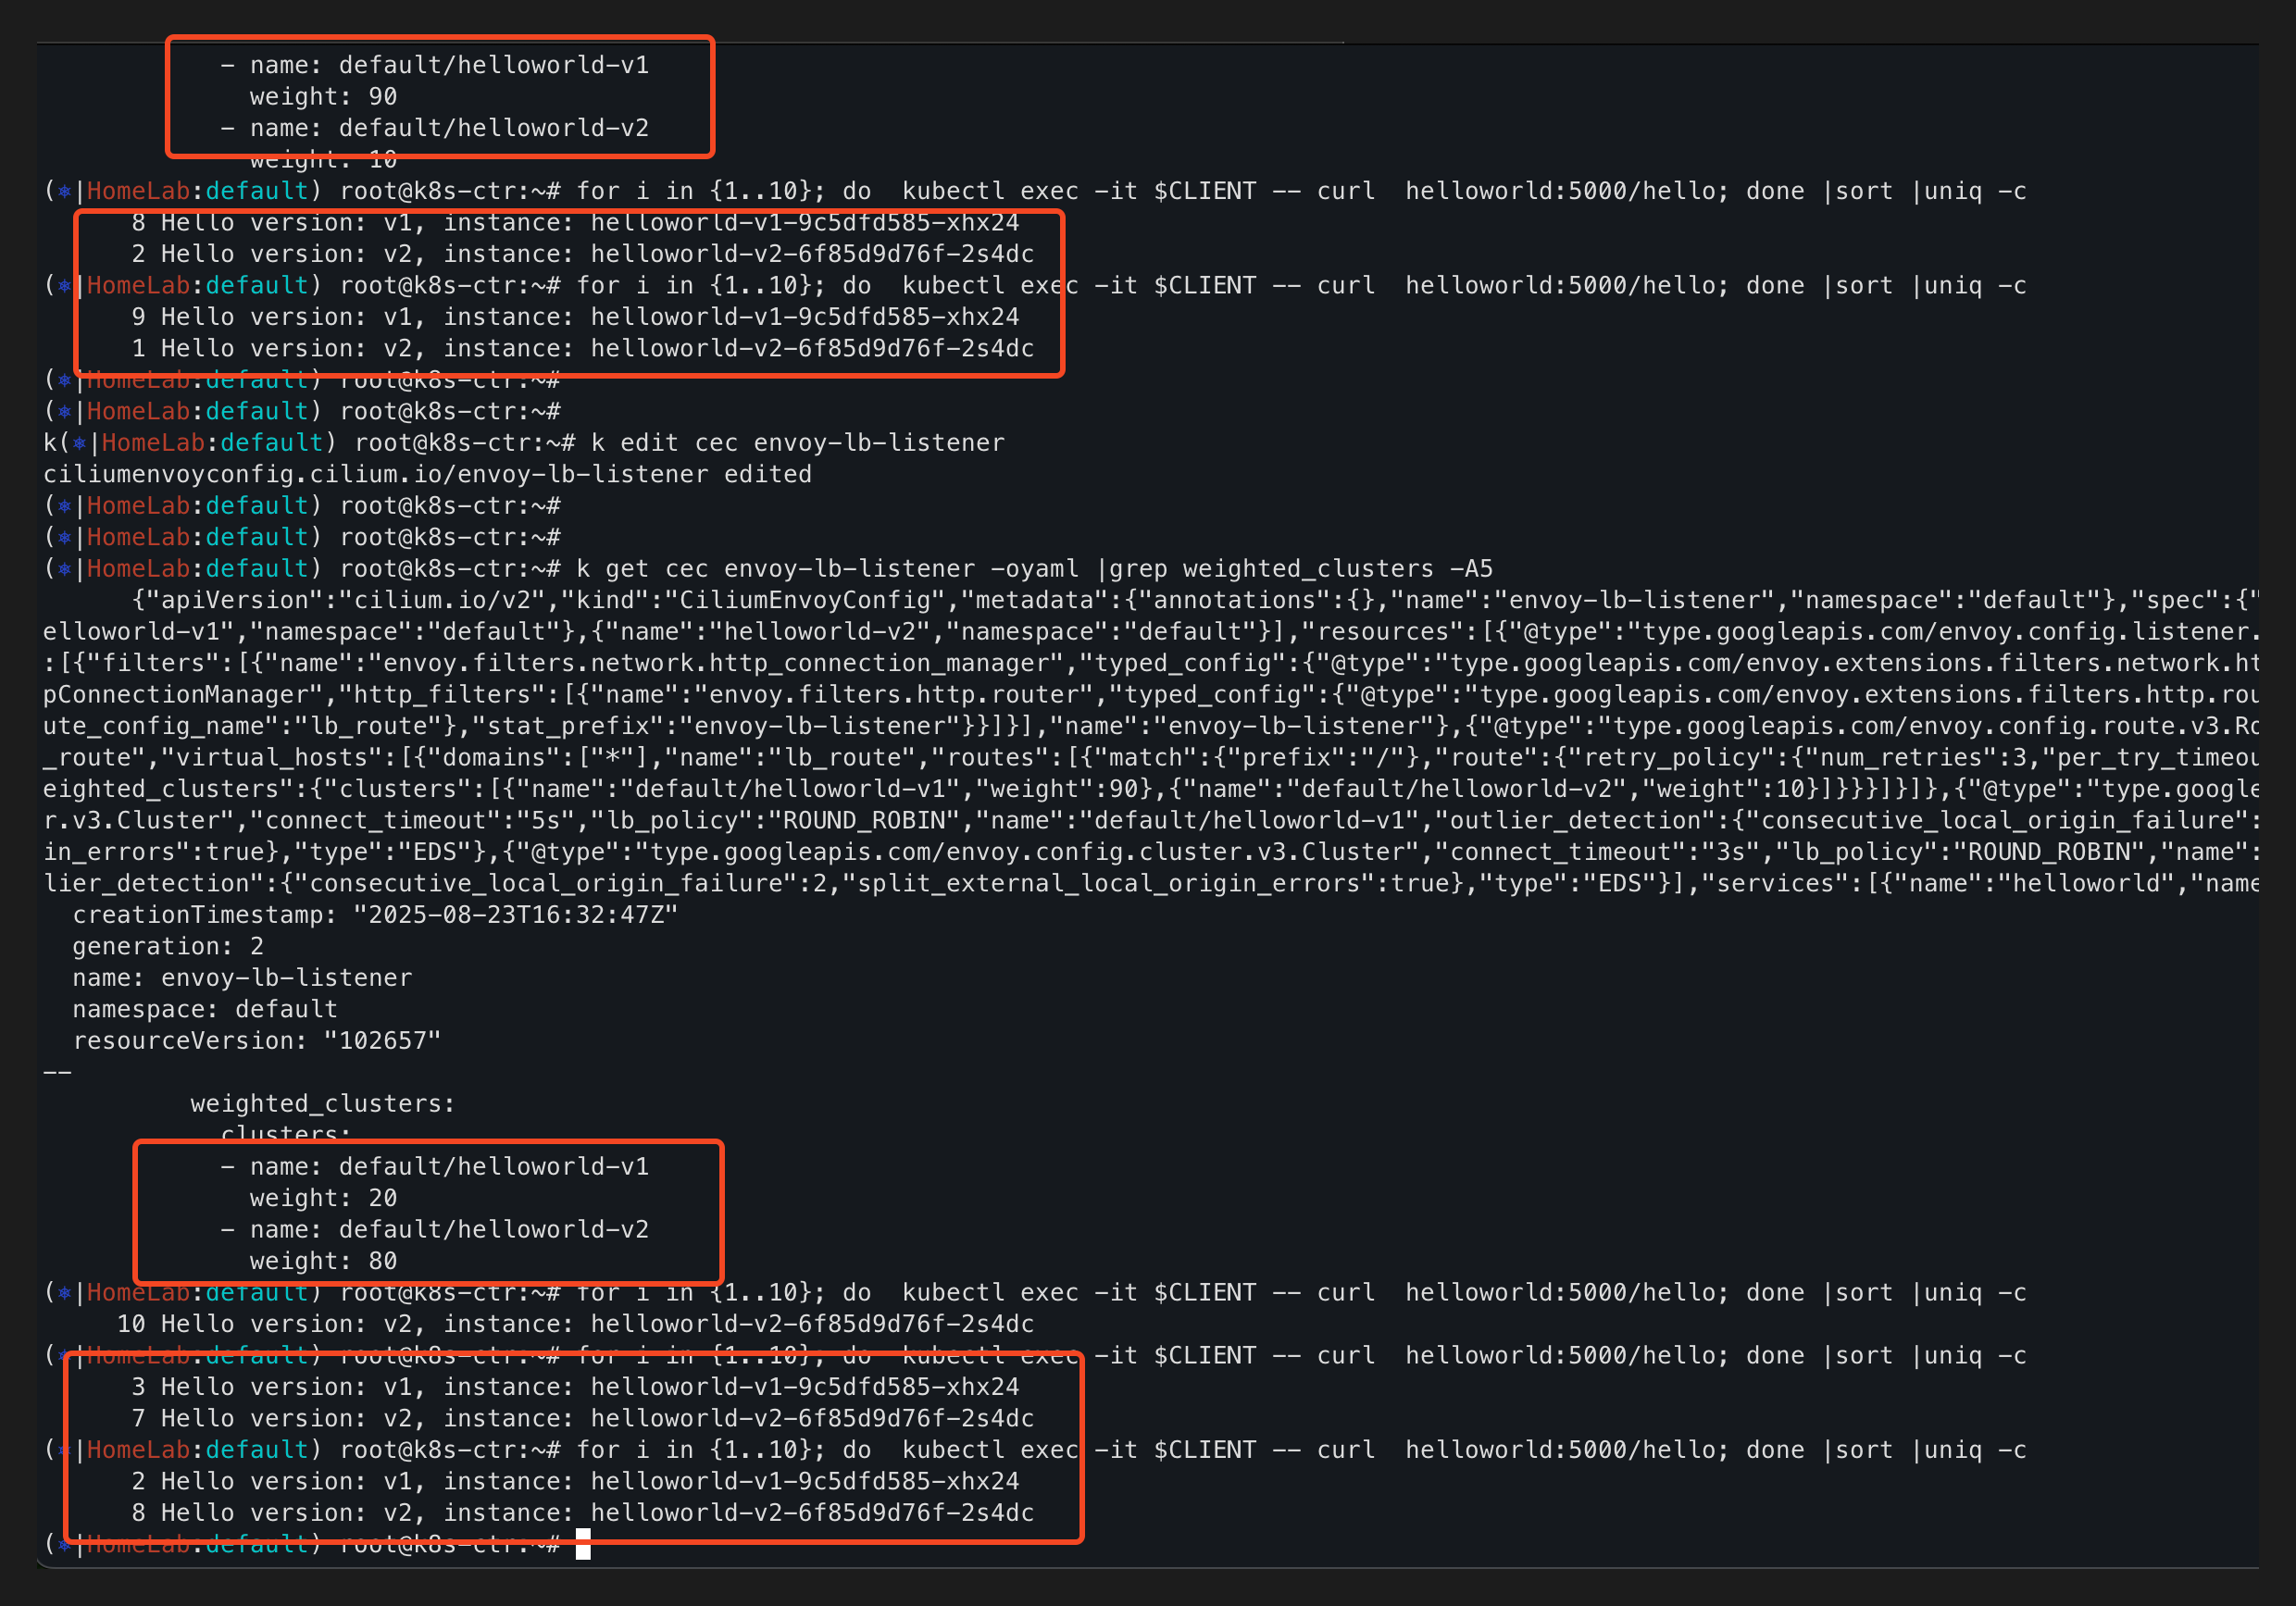
테스트 앱을 배포한 다음에 curl로 테스트를 해보면 비율이 거의 5:5 정도를 유지한다.
만약 v1, v2를 canary 업그레이드하고 싶다면 트래픽 비율을 점차 늘려가고 싶을것이다. 이럴때 사용한다.
--- 테스트 앱 배포 ---
kubectl apply -f https://raw.githubusercontent.com/cilium/cilium/1.18.1/examples/kubernetes/servicemesh/envoy/client-helloworld.yaml

--- 테스트 호출, 비율 일정하지 않음 ---
(⎈|HomeLab:default) root@k8s-ctr:~# for i in {1..10}; do  kubectl exec -it $CLIENT -- curl  helloworld:5000/hello; done
Hello version: v1, instance: helloworld-v1-9c5dfd585-xhx24
Hello version: v2, instance: helloworld-v2-6f85d9d76f-2s4dc
Hello version: v2, instance: helloworld-v2-6f85d9d76f-2s4dc
Hello version: v2, instance: helloworld-v2-6f85d9d76f-2s4dc
Hello version: v1, instance: helloworld-v1-9c5dfd585-xhx24
Hello version: v2, instance: helloworld-v2-6f85d9d76f-2s4dc
Hello version: v1, instance: helloworld-v1-9c5dfd585-xhx24
Hello version: v1, instance: helloworld-v1-9c5dfd585-xhx24
Hello version: v2, instance: helloworld-v2-6f85d9d76f-2s4dc
Hello version: v2, instance: helloworld-v2-6f85d9d76f-2s4dc
테스트 서비스를 배포하면 helloworld pod과 서비스가 배포되며, 이를 분배할 v1, v2 서비스도 같이 배포된다.
그리고 cec를 배포하면, helloworld로 인입되는 트래픽에 대해서 helloworld-v1, helloworld-v2 서비스로 비율로 분배가 된다.
--- 테스트를 위한 서비스 배포 ---
kubectl apply -f https://raw.githubusercontent.com/cilium/cilium/1.18.1/examples/kubernetes/servicemesh/envoy/helloworld-service-v1-v2.yaml

--- 트래픽 비율 조정을 위한 cec 배포 ---
kubectl apply -f https://raw.githubusercontent.com/cilium/cilium/1.18.1/examples/kubernetes/servicemesh/envoy/envoy-helloworld-v1-90-v2-10.yaml

--- cec를 보면 weight로 트래픽 비율 조정 가능 ---
'''
  - '@type': type.googleapis.com/envoy.config.route.v3.RouteConfiguration
    name: lb_route
    virtual_hosts:
    - domains:
      - '*'
      name: lb_route
      routes:
      - match:
          prefix: /
        route:
          retry_policy:
            num_retries: 3
            per_try_timeout: 1s
            retry_on: 5xx
          weighted_clusters:
            clusters:
            - name: default/helloworld-v1
              weight: 90 # 서비스에 대한 트래픽 비율 조정
            - name: default/helloworld-v2
              weight: 10
'''
    type: EDS
  services:
  - name: helloworld # 이 서비스에 대해 적용한다.
    namespace: default
'''cec weighted_clsuters의 비율을 조정하면서 curl로 테스트를 해보면, 조정한 비율과 비슷하게 동작하는걸 확인할 수 있다.
끝.. 생소한 내용이 많아서 찾아보고 테스트해보고 이해하고 하느라 시간이 오래 걸렸다..

'기술 토론장 > [K8s] Kubernetes' 카테고리의 다른 글
| kube-apiserver oom 죽지 않기 w. APF (1) | 2025.08.31 |
|---|---|
| [Cilium][7주차] K8s, Cilium 부하 테스트 & 성능 측정 (1) | 2025.08.30 |
| [Cilium][6주차] Service Mesh Gateway API Support (1) | 2025.08.23 |
| [Cilium][6주차] Service Mesh Ingress Support (1) | 2025.08.23 |
| [Cilium][5주차] Cilium Clsuter Mesh (5) | 2025.08.17 |