비슷한 개념일지? 모르겠지만, 과거부터 한창 보안을 이야기할 때 zero trust라는 개념이 등장했다.
네트워크 안/밖을 구분하지 않고 모든 요청에 대해서 새롭게 인증을 하고, end to end 암호화를 하는것이 주요 골자이다.
이번에는 cilium을 통해서 end to end 암호화 wireguard와 cilium에서 하고 있는 tetragon에 대해서 알아보려고 한다.
Cilium WireGuard
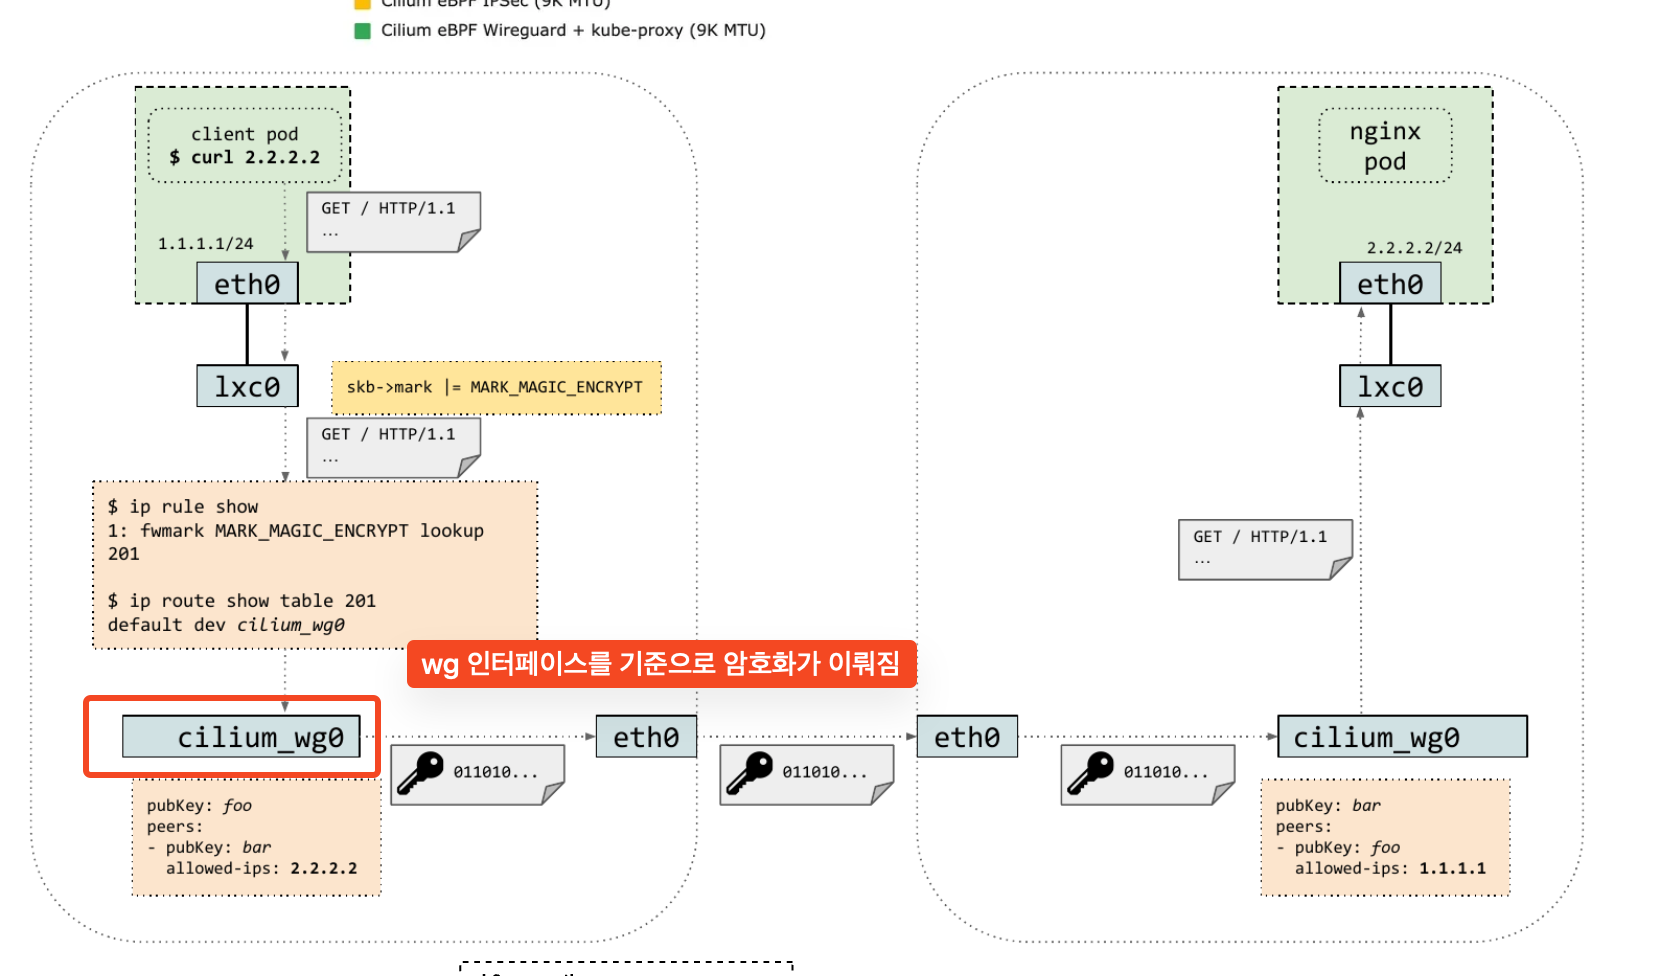
기본적으로 k8s pod끼리는 평문 통신을 하게 되고, 패킷 스니핑을 하게 되면 패킷 내용을 알 수 있는 위험이 있다.
- 하지만 이런 경우가 발생한다면, 이미 내부 시스템은 모두 침해가 된 상태이기 때문에
- end to end 암호화를 하더라도 다른 방법으로 데이터를 탈취할 가능성이 아주아주 많을것 같다.
그래서 end to end 암호화를 해서, 패킷 스니핑을 하더라도 패킷 내용을 알지 못하게 하는것을 목적으로 한다.
cilium wire guard에서 활성화를 하면, cilium_wg0 인터페이스가 새로 생기며, 해당 인터페이스에서 암호화가 이뤄진다.
- 반대로 말하면, 만약 노드 침투까지 가능하고 cilium_wg0 인터페이스를 확인한다면, 평문 패킷을 얻을 수 있다.
WireGuard 설치 방법
설치는 간단하다. encryption 옵션을 활성화하고, type을 wireguard로 설정하고 배포를 하면 된다.
helm upgrade cilium cilium/cilium --version 1.18.1 --namespace kube-system --reuse-values \
--set encryption.enabled=true --set encryption.type=wireguard배포하고 나면, cilium encrypt를 확인해보면 설정되었음을 확인할 수 있고 cilium_wg0 인터페이스도 생성되어있다.
(⎈|HomeLab:N/A) root@k8s-ctr:~# kubectl exec -it -n kube-system ds/cilium -- cilium encrypt status
Encryption: Disabled

--- 변경 후 wire guard가 생김---
(⎈|HomeLab:N/A) root@k8s-ctr:~# kubectl exec -it -n kube-system ds/cilium -- cilium encrypt status
Encryption: Wireguard
Interface: cilium_wg0
	Public key: zNpKlknDAcq/xz1Iu3WlqRDmS4IuoizwHpNQ7/jMlRc=
	Number of peers: 2

--- cilium_wg0 인터페이스가 생김 ---
(⎈|HomeLab:N/A) root@k8s-ctr:~# ifconfig |grep cilium_
cilium_host: flags=4291<UP,BROADCAST,RUNNING,NOARP,MULTICAST>  mtu 1500
cilium_net: flags=4291<UP,BROADCAST,RUNNING,NOARP,MULTICAST>  mtu 1500
cilium_wg0: flags=209<UP,POINTOPOINT,RUNNING,NOARP>  mtu 1420


--- wg를 보면 암호화를 위해서 다른 노드와 peer가 맺어져있음 ---
(⎈|HomeLab:N/A) root@k8s-ctr:~# wg show
interface: cilium_wg0
  public key: bfXJGzUk/abBwx8giTQa1Z0zfWetLJo1jOooJPxQ3FE=
  private key: (hidden)
  listening port: 51871
  fwmark: 0xe00

peer: zNpKlknDAcq/xz1Iu3WlqRDmS4IuoizwHpNQ7/jMlRc=
  endpoint: 192.168.10.101:51871
  allowed ips: 192.168.10.101/32, 172.20.1.186/32, 172.20.1.203/32, 172.20.1.0/24, 172.20.1.119/32
  latest handshake: 16 minutes, 21 seconds ago
  transfer: 3.76 KiB received, 3.29 KiB sent

peer: 1ie9jSZ2PlFZiuJifCvv3Vkp/McH36vreot5vVtKU2o=
  endpoint: 192.168.10.102:51871
allowed ips: 172.20.2.192/32, 172.20.2.248/32, 172.20.2.53/32, 172.20.2.0/24, 192.168.10.102/32그리고 다른 노드로 서비스를 호출해보면 기존과 다르데 cilium_wg0 인터페이스로 전달하고,
트래픽을 받을 때도 다시 cilium_wg0 인터페이스로 받아서 lxc 인터페이스로 전달하는것을 볼 수 있다.

Cilium TLS Inspection
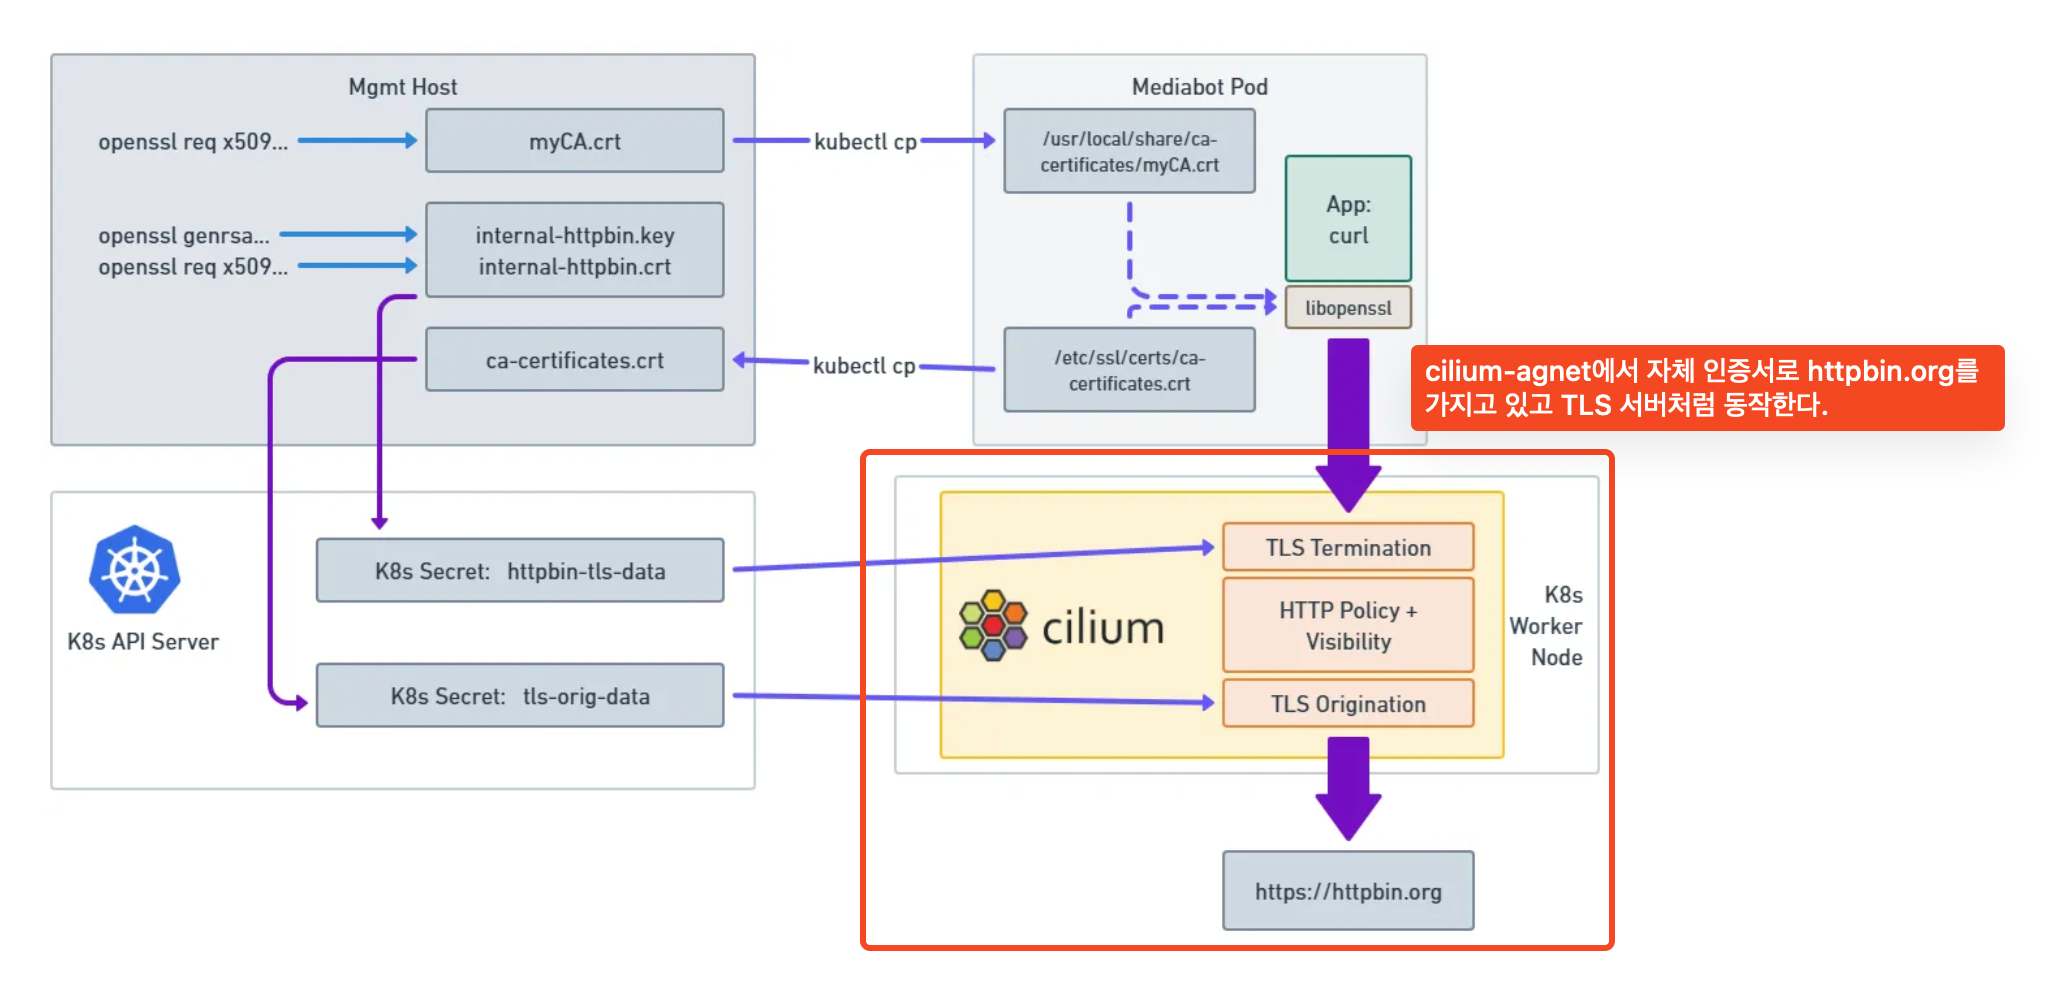
개인적으로 신기하다고 생각하다고 생각했던 기능이다. TLS 통신을 할 때 cilium에서 이를 검사를 하는것이다.
일반적으로 생각하기를.. tls 통신을 하면 패킷 스니핑을 하더라도 암호화되어 있기 때문에 안전하다고 생각하는데,
tls를 하는 이유가 중간자공격을 대비하기 위해서인데, cilium이 합법적인 중간자공격을 하는것이다!!
대략적인 흐름은 아래와 같다.
1. client -> server로 tls 요청을 하면
2. cilium envoy가 tls termination을 한다.
3. 복호화 된 요청을 처리하고
4. 다시 암호화해서 실제 server로 다시 전달하고, 응답은 역방향으로 다시 진행된다.
Cilium TLS Inspection 테스트
테스트를 하기 위해서는 먼저 tls termination을 하기 위해서 ca 개인키와 인증서를 만들어야 한다.
ca 개인키를 만든다.
root@k8s-ctr:~# openssl genrsa -des3 -out CA.key 2048
Enter PEM pass phrase:
Verifying - Enter PEM pass phrase:
(⎈|HomeLab:N/A) root@k8s-ctr:~# ls |grep CA
CA.keyca 개인키로 ca 인증서를 생성한다.
root@k8s-ctr:~# openssl req -x509 -new -nodes -key CA.key -sha256 -days 10000 -out CA.crt
Enter pass phrase for CA.key:
You are about to be asked to enter information that will be incorporated
into your certificate request.
What you are about to enter is what is called a Distinguished Name or a DN.
There are quite a few fields but you can leave some blank
For some fields there will be a default value,
If you enter '.', the field will be left blank.

Country Name (2 letter code) [AU]:KR
State or Province Name (full name) [Some-State]:seoul
Locality Name (eg, city) []:seoul
Organization Name (eg, company) [Internet Widgits Pty Ltd]:jini
Organizational Unit Name (eg, section) []:jini
Common Name (e.g. server FQDN or YOUR name) []:jini.com
Email Address []:

(⎈|HomeLab:N/A) root@k8s-ctr:~# ls |grep crt
CA.crt1,000일짜리로 인증서가 생성된 모습이다.
(⎈|HomeLab:N/A) root@k8s-ctr:~# openssl x509 -in CA.crt -noout -dates
notBefore=Sep  6 15:13:28 2025 GMT
notAfter=Jan 22 15:13:28 2053 GMT
(⎈|HomeLab:N/A) root@k8s-ctr:~# openssl x509 -in CA.crt -noout -text
Certificate:
    Data:
        Version: 3 (0x2)
        Serial Number:
            5f:13:a4:60:b3:af:a6:22:ba:e0:c6:7f:d8:d9:d4:3e:41:4e:91:38
        Signature Algorithm: sha256WithRSAEncryption
        Issuer: C = KR, ST = seoul, L = seoul, O = jini, OU = jini, CN = jini.com
        Validity
            Not Before: Sep  6 15:13:28 2025 GMT
            Not After : Jan 22 15:13:28 2053 GMT
        Subject: C = KR, ST = seoul, L = seoul, O = jini, OU = jini, CN = jini.com
        Subject Public Key Info:
            Public Key Algorithm: rsaEncryption
                Public-Key: (2048 bit)
Modulus:지금까지 ca 인증서를 만들었다면, 이제는 tls termination을 할 도메인에 대한 키와 인증서를 만들어야 한다.
- openssl req로 인증서를 만들 때, 도메인을 입력하는 부분이 있는데 여기에서 tls termination할 도메인을 잘 적어야한다.
(⎈|HomeLab:N/A) root@k8s-ctr:~# openssl req -new -key internal-httpbin.key -out internal-httpbin.csr
'''
Common Name (e.g. server FQDN or YOUR name) []:httpbin.org
'''

(⎈|HomeLab:N/A) root@k8s-ctr:~# ls -al |grep http
-rw-r--r--  1 root    root     989 Sep  7 00:20 internal-httpbin.csr
-rw------- 1 root root 1704 Sep 7 00:19 internal-httpbin.key이제 제일 처음에 만들었던 ca 인증서와 키를 가지고 다시 도메인에 대한 인증서를 만들었다.
그리고 envoy에서 tls termination을 하기 위해서 이를 secrets으로 생성한다.
(⎈|HomeLab:N/A) root@k8s-ctr:~# openssl x509 -req -days 360 -in internal-httpbin.csr -CA CA.crt -CAkey CA.key -CAcreateserial -out internal-httpbin.crt -sha256
Certificate request self-signature ok
subject=C = AU, ST = Some-State, O = Internet Widgits Pty Ltd, CN = httpbin.org
Enter pass phrase for CA.key:

---
(⎈|HomeLab:N/A) root@k8s-ctr:~# ls -al |grep http
-rw-r--r--  1 root    root    1188 Sep  7 00:21 internal-httpbin.crt
-rw-r--r--  1 root    root     989 Sep  7 00:20 internal-httpbin.csr
-rw-------  1 root    root    1704 Sep  7 00:19 internal-httpbin.key


--- 사설 키로 서명한 httpbin 인증서와 키를 저장
(⎈|HomeLab:N/A) root@k8s-ctr:~# kubectl create secret tls httpbin-tls-data -n kube-system --cert=internal-httpbin.crt --key=internal-httpbin.key마지막으로 제일 처음에 만들었던 사설 인증서를 pod에 복사하고, 인증서 업데이트를 진행한다.
(⎈|HomeLab:N/A) root@k8s-ctr:~# kubectl cp CA.crt default/mediabot:/usr/local/share/ca-certificates/CA.crt
(⎈|HomeLab:N/A) root@k8s-ctr:~# kubectl exec mediabot -- update-ca-certificates그리고 진짜 마지막으로 root ca 인증서를 kube-system secrets으로 만들어서 tls를 신뢰할 수 있도록 한다.
- 솔직히.. 이 부분은 좀 이해가 안된다.
(⎈|HomeLab:N/A) root@k8s-ctr:~# openssl x509 -in ca-certificates.crt  -noout -text
(⎈|HomeLab:N/A) root@k8s-ctr:~# kubectl create secret generic tls-orig-data -n kube-system --from-file=ca.crt=./ca-certificates.crt
(⎈|HomeLab:N/A) root@k8s-ctr:~# openssl x509 -in ca-certificates.crt  -noout -text
Certificate:
    Data:
        Version: 3 (0x2)
        Serial Number: 6828503384748696800 (0x5ec3b7a6437fa4e0)
        Signature Algorithm: sha1WithRSAEncryption
        # ACCV 스페인 공공기관에서 발급한 root ca 중 1개이다.
        Issuer: CN = ACCVRAIZ1, OU = PKIACCV, O = ACCV, C = ES
        Validity
            Not Before: May  5 09:37:37 2011 GMT
Not After : Dec 31 09:37:37 2030 GMT지금까지 사설 ca를 생성하고, ca 키로 인증한 httpbin 인증서와 키를 만들었다면, 이제는 cilium에서 cnp를 적용한다.
설정 내용을 보면 httpbin.org 도메인에 대해서 termination을 할 때는 사설 ca 로 인증한 thttp 인증서와 키를 사용하고
cilium에서 다시 origin tls를 설정하고, server와 통신할 때 pod에서 복사해서 생성한 tls-origi-data secrets을 사용하는것이다.
apiVersion: cilium.io/v2
kind: CiliumNetworkPolicy
metadata:
  name: l7-visibility-tls
  namespace: default
spec:
  description: L7 policy with TLS
  egress:
  - toFQDNs:
    - matchName: httpbin.org
    toPorts:
    - originatingTLS:
        secret:
          name: tls-orig-data
          namespace: kube-system
      ports:
      - port: "443"
        protocol: TCP
      rules:
        http:
        - {}
      terminatingTLS:
        secret:
          name: httpbin-tls-data
          namespace: kube-system
  - toPorts:
    - ports:
      - port: "53"
        protocol: ANY
      rules:
        dns:
        - matchPattern: '*'
  endpointSelector:
    matchLabels:
      class: mediabot
org: empire실제로 httpbin.org 도메인으로 https 요청을 하고, 인증서 정보를 보면 CN=jini로 되어 있다. 사설 ca로 서명한 사설 인증서 정보를 준다.
(⎈|HomeLab:N/A) root@k8s-ctr:~# kubectl exec -it mediabot -- curl -sL 'https://httpbin.org/anything' -v
'''
* Server certificate:
*  subject: C=AU; ST=Some-State; O=Internet Widgits Pty Ltd; CN=httpbin.org
*  start date: Sep  6 15:21:37 2025 GMT
*  expire date: Sep  1 15:21:37 2026 GMT
*  common name: httpbin.org (matched)
   # 사설 ca가 인증한 인증서이다.
*  issuer: C=KR; ST=seoul; L=seoul; O=jini; OU=jini; CN=jini.com
*  SSL certificate verify ok.
'''
* using HTTP/1.x
> GET /anything HTTP/1.1
> Host: httpbin.org
> User-Agent: curl/7.88.1tls termination을 해서, 패킷 모니터링을 한다는 생각은 한번도 안해봤는데 신기한 cilium 기능이다.
사설 ca를 생성하고, 모니터링하고 싶은 도메인에 대한 인증서를 적용하고 termination까지.. 신기하다 신기해
Tetragon
tetragon은 cilium팀에서 만든 eBPF 기반의 런타임 보안 솔루션이다. cilium에서 보안 솔루션까지 제공하고 있다니..
아주 예전에 Wazsh에 대한 PoC를 진행한적이 있다. 둘다 보안 이벤트를 수집하는것을 목적에 두지만 큰 차이점이 있다.
[Wazuh] Wazuh란? 구성 및 개념도[1/2]
Wazuh란? Wazuh는 클라우드, 컨테이너, 서버를 보호하기 위한 오픈소스 플랫폼의 서비스이다. 즉, 잘만 사용하면 여느 유료 솔루션 부럽지 않은 Server H-IDS 유형의 오픈소스 솔루션이다. 로그 데이터
dobby-isfree.tistory.com
tetragon은 cilium팀에서 만들었고, eBPF를 쓰는만큼 커널/프로세스 등의 커널 시스템콜 등의 모니터링에 특화되어 있는것 같다.
설치도 cilium 팀에서 제공하고 있는만큼 cilium repo를 사용하고 설치도 아주 간단하다.
helm repo add cilium https://helm.cilium.io
helm repo update
helm install tetragon cilium/tetragon -n kube-systemxwing에서 여러가지 테스트를 해보면 pod의 행위를 그대로 볼 수 있다.
- 결과만 놓고보면 wazuh에서 보는거랑 크게 다르지 않다.
- wazuh에서도 curl 등의 이벤트가 발생하면 시스템콜을 기반으로 거의 동일한 결과를 보여준다.
(⎈|HomeLab:N/A) root@k8s-ctr:~# kubectl exec -ti -n kube-system $POD -c tetragon -- tetra getevents -o compact --pods xwing
🚀 process default/xwing /usr/bin/bash -c "curl https://ebpf.io/applications/#tetragon"
🚀 process default/xwing /usr/bin/curl https://ebpf.io/applications/#tetragon
💥 exit    default/xwing /usr/bin/curl https://ebpf.io/applications/#tetragon 0
🚀 process default/xwing /usr/bin/bash -c "curl https://httpbin.org"
🚀 process default/xwing /usr/bin/curl https://httpbin.org
💥 exit    default/xwing /usr/bin/curl https://httpbin.org 0
🚀 process default/xwing /usr/bin/bash -c "cat /etc/passwd"
🚀 process default/xwing /usr/bin/cat /etc/passwd
💥 exit    default/xwing /usr/bin/cat /etc/passwd 0
🚀 process default/xwing /usr/bin/bash -c "touch /tmp/aa"
🚀 process default/xwing /usr/bin/touch /tmp/aa
💥 exit default/xwing /usr/bin/touch /tmp/aa 0이번 게시물을 끝으로 cilium 스터디의 8주 과정은 모두 끝났다.
cilium을 cni로 사용하고 있지만, 잘 모르고 혼자 공부하기도 어려워서 cilium 스터디를 참여했다.
- 스터디는 같은 팀원이 알려주었고, 모르는것도 많이 물어봤었는데 잘 알려주었다. 아야 감사합니다 :)
그리고 8주간 스터디를 다 했다고 해서, cilium을 완벽하게 알았는가? 그건 절대 아닌것 같다.
다만, 이전에는 어떤걸 공부하고, 어떻게 동작하는지 전혀 알지 못했다면 이제는 어느정도 가닥은 찾아볼 수 있을것 같다? 정도이다.
cilium 스터디를 하면서 평소 관심을 두지 않았던 요소에 대해서도 부족함을 알게되었다.
공부를 하다보니 부족함을 느끼고 공부를 하고 부족함을 느끼고 시작한 공부에서 다시 또 부족함을 느끼고 다른 공부를 하고ㅋㅋㅋ
끝나지 않는 굴레이다.

지금까지 스터디를 잘 진행해주신 가시다님과 스터디를 소개주신 아야에게 다시 한번 감사의 인사를 드립니다 :) 감사합니다.
'기술 토론장 > [K8s] Kubernetes' 카테고리의 다른 글
| [Cilium][8주차] Cilium Security & CiliumNetworkPolicy (0) | 2025.09.06 |
|---|---|
| kube-apiserver oom 죽지 않기 w. APF (1) | 2025.08.31 |
| [Cilium][7주차] K8s, Cilium 부하 테스트 & 성능 측정 (1) | 2025.08.30 |
| [Cilium][6주차] L7 Aware Traffic Management (0) | 2025.08.24 |
| [Cilium][6주차] Service Mesh Gateway API Support (1) | 2025.08.23 |